Advertisement
They're right there in the bottom of the boat, and you hardly give them a thought. But the lowly hose clamp could be all that's keeping your boat afloat.

Hose clamps come in a variety of sizes. Those for use on boats should be manufactured from 316 stainless steel or better.
According to the GEICO | BoatUS Marine Insurance claims files, more than 40% of boat sinkings happen while the boat is tied to the dock. In many instances, the sinking was due to a hose coming loose or detached from a thru-hull below the waterline. The number of insurance claims attributed to detached hoses demonstrates just how vital properly installed hose clamps are to the integrity of your boat.
Tip
In one case we reviewed, a large sportfishing boat sank due to a failed clamp on a cockpit scupper drain hose. Usually any water finding its way into the cockpit would run down a hose and out a thru-hull on the transom. On this particular boat, the transom outlet was just a few inches above the waterline. But a corroded hose clamp on the inside of the boat allowed the hose to become detached. When the boat backed down on a fish, water entered through the fitting and into the bilge. Over time the boat took on more and more water, sinking lower until water reached the transom fitting. Water flooded into the boat, causing it to sink. The boat was declared a total loss.
Everything You Need To Know About Hose Clamps
Hose clamps have been around for more than a century. The first patent for a screw-type band clamp was issued in 1896. Still, it was not until 1921, when a retired British naval commander started commercially manufacturing them under the Jubilee name, that they came into everyday use.
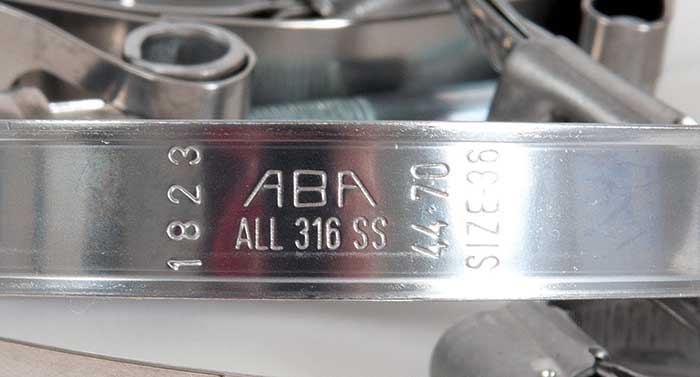
Good quality hose clamps are marked with the material they’re manufactured from. This one is 316 stainless steel and acceptable for use aboard.
Any hose clamp used on a boat should be made from high-grade stainless steel to resist corrosion; zinc-plated clamps or those made from plain steel will rust and fail. Keep in mind, though, that not all stainless steel is the same. Clamp components should be manufactured from 316 stainless steel as a minimum. Cheaper clamps are made using 304 stainless, a lesser grade that doesn't contain molybdenum and is more prone to corrosion. Also note that sometimes the band may be stainless, but the screw or gear housing isn't; these, too, should be rejected. Avoid buying hose clamps from the local hardware store unless you can verify the brand and type.
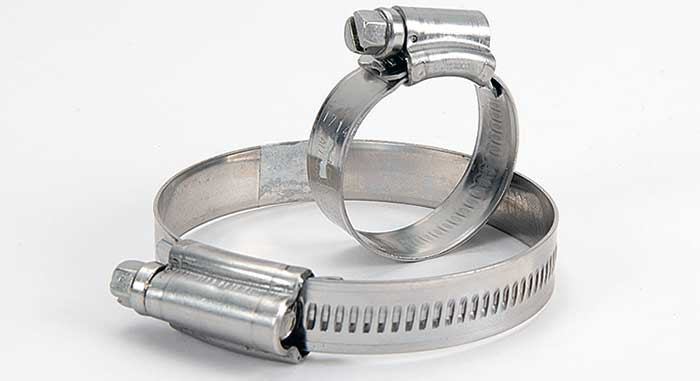
Embossed threads like those shown here are better than punched threads, which can corrode.
Hose clamps may either have a perforated band, where the thread is stamped out, or embossed. The latter is better; the thread is formed on the clamp band without making holes. Avoid using hose clamps with perforated bands because the holes reduce the strength of the clamp and offer a place for corrosion to start, issues that can be avoided by using embossed bands.
One Clamp Or Two?
There's a lot of misinformation on the web and internet forums. One myth is that all thru-hulls should have two clamps. This is untrue. American Boat & Yacht Council (ABYC) standards only recommend two clamps for exhausts and fuel fill systems. That said, you can use two clamps to secure any hose if there is enough space on the fitting so the second clamp won't crush or cut it. (The edges of some hose clamps are sharp.) This can be especially true of T-bar clamps used on exhaust systems that are tightened with a socket wrench. Many of the better clamps have a slightly rounded edge, often referred to as "relieved," to avoid this issue.
In all applications, it's essential to use the right size clamp. One that's too small may barely fit around the hose, or not at all, and won't secure the hose in place. A clamp that's too large, once tightened, will often leave a long tail sticking out that can slice skin or nearby components. Further, a too-large clamp may form a malformed circle, damaging the underlying hose while providing less-than-perfect grip.
Advertisement
Installing Hose Clamps
To work properly, install hose clamps correctly and carefully. Slide the clamp onto the hose before the hose is pushed onto the barbed fitting. Once the hose is correctly seated, slide the clamp into place over the fitting and tighten. There should be between one-quarter to three-eighths of an inch of hose showing between the clamp and the end of the hose.
In many cases, clamps can be tightened sufficiently using a screwdriver, but many installers prefer using a nut driver as it is less likely to slip. It can be tempting to use a small ratchet, but doing so can easily lead to overtightening, which can damage the hose.
Don't fit a clamp over hose with no proper nipple underneath; the clamp may cut the hose.
Some larger and more robust hose clamps, like those used on many exhaust systems, must be tightened with a suitable socket and ratchet. These are often T-bar clamps, which, instead of having a worm-type screw and thread, have a threaded stud and cross piece on one end attached via a swivel to the band. The other end passes through another separate bar attached to the other end of the clamp. Tightening the nut on the end of the threaded stud forces the two T pieces toward each other, thus tightening the clamp.
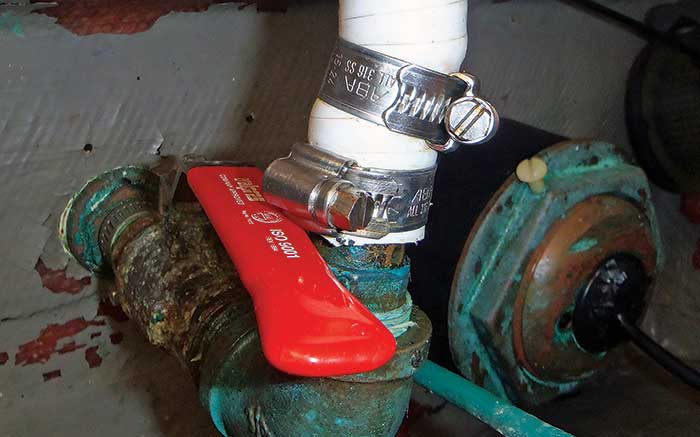
No matter how good quality a hose clamp is, it can't be expected to work wonders. A common error is where a hose is clamped around a threaded fitting. The clamp may feel like it is holding the hose in place, and may well be, but liquid or, worse still, exhaust gasses can travel down the threads and leak into the boat. Similarly, it's bad practice to connect a hose to a plain pipe, for no matter how much you tighten the hose clamps, there's a good chance that a hose may, over time, work its way off the pipe. Hoses should, in almost every situation, be connected to a barbed fitting that, in concert with properly tightened hose clamp, makes a near-perfect joint.
Inspect Your Hose Clamps
At least once or twice per season, inspect all the hose clamps on your boat to ensure that they're still performing their assigned purpose — keeping a hose connected to some other fitting. Here's what to look for:
- Visually inspect all clamps. If you see rust or it appears loose or deficient in some way, investigate further.
- Out-of-the-way clamps, such as the ones on the hose at the aft end of shaft gland or washdown/livewell hoses tucked out of the way, often get overlooked. Use a flashlight and mirror to check them.
- Keeping water on the outside of the boat is one of a hose clamp's most essential functions, but don't forget to also inspect those that hold sanitation hoses in place. A failed fitting is likely to be unpleasant at best and could be a real health hazard. These clamps are more likely to corrode because of what's going through the hose, including head and holding tank treatments.
- Bilge pumps are reliant on correct hose connections. If a hose comes loose from a pump, not only will it prevent water from being sucked from the bilge, but the pump may run continuously, draining the battery.
- Pay special attention to hoses connected to bilge blowers on inboard-powered boats with gasoline engines. It's not uncommon to see the hose detached from the blower, rendering it useless and possibly leading to an explosion.
- Exhaust systems require two hose clamps where any flexible hose joins any other piece of fixed equipment — such as a muffler.
- While checking clamps, look closely at the hose that the clamp is holding in place. A too-tight hose clamp may cut into the hose, weakening it.
- Periodically check the clamp screw for tightness with a screwdriver or nut driver. If the screw is loose in its housing, it's time to replace the clamp.