Advertisement
Crazing in gelcoat, also known as spider cracks or stress cracks, plagues countless boaters. Here's how to fix the problem.
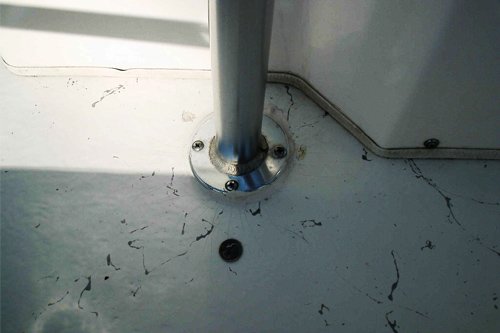
Crazing is an incredibly common issue on modern fiberglass boats, and although it usually starts off as a matter of cosmetics, in severe cases these surface cracks can grow, deepen, and eventually threaten your boat's structural integrity. They usually form in areas where the fiberglass is under unusual stress (such as rail stanchion and anchor pulpit attachment points, transom corners, and around hardware), or in areas where significant impacts have occurred, such as rub-rail collision zones or where a heavy object was dropped. You'll want to fix them quickly because they can grow worse over time — but don't worry, it isn't a hard job. With a little bit of know-how and a few basic tools, you can tackle this task on your own.
Before You Begin
If the cracks on your boat were caused by impacts, such as around rub rails or where a heavy object was dropped, move on to Step 1. If, however, the spider cracks appeared at an attachment point or in a high-stress area, there's a good chance they'll simply return after you fix them. In this case, before you attack a single crack, you need to reinforce the area. Adding (or up-sizing) backing plates to attachment points and bracing to high-stress areas is probably going to be necessary. There's some chance you'll discover the need for significant repair work, such as a broken bulkhead, which is best left to a pro. But in most cases, DIY reinforcements should do the trick. How will you know if the reinforcing job you've done is sufficient? There's really no way to be sure, until you repair the crazing and see if the cracks come back.
Tip
Always use a sanding block when sanding. It'll prevent you from accidentally pressing too hard in one area, and inadvertently creating a low spot. On curved surfaces, use flexible foam or rubber blocks.
-
STEP 1: Prep The Area For Crack Removal
Before you can start to fix crazing, clear the area of any obstructions and remove all hardware that covers or obscures any part of the cracks. Then, get busy cleaning. Thoroughly wash and dry the area, and remove all obvious surface contaminants with a rag dipped in a strong solvent like acetone.
-
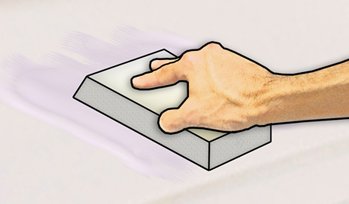
STEP 2: Sand The Surface
A surface area at least a quarter-of-an-inch wide (including the crack itself) will need to be sanded with medium-grit sandpaper. If you're dealing with a few long cracks that are separated by an inch or more, you can sand each one individually; otherwise sand the entire area of cracking.
Sand the fiberglass down until there's no shine left, so you know the gelcoat's surface has been removed. In the case of very fresh, shallow crazing, sanding alone may remove some or all of the cracks.
-
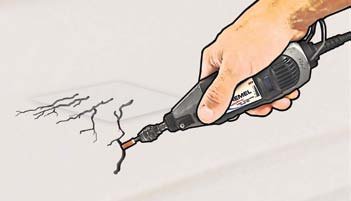
STEP 3: Grind Out The Cracks
Fit your Dremel with a silicon carbide or tungsten carbide bit, in a bullet or cone shape. Using the highest speed possible (bits turning at lower speeds tend to grab and rip the gelcoat, causing chips and splinters instead of a smoothly ground surface), start at one end of each remaining crack and grind all the way to its other end. You'll need to grind down through the crack until you've exposed uncracked gelcoat or fiberglass beneath the surface, but don't try to rush this part of the job; let the bit and its speed do the work, as opposed to applying a lot of pressure. It's usually best to run the Dremel along each crack lightly then go back and do it again, as opposed to trying to grind deeply on the first pass.
-
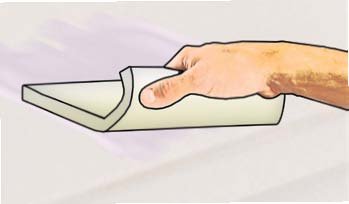
STEP 4: Prep The Area For Filling And Patching
Once all the cracks have been ground away with the Dremel, re-sand the area with the sandpaper to smooth out any rough edges or burrs. Wipe away all of the sanding dust and ground fiberglass bits, then wipe down the entire area with the rag dipped in solvent again. It's very important at this stage to ensure that the surface is completely clean and uncontaminated.
-
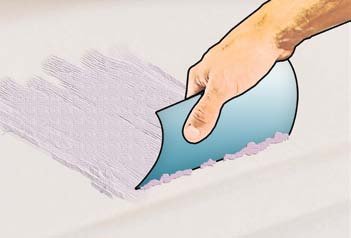
STEP 5: Fill And Finish The Cracks
Using gelcoat paste, add a coloring agent to match the color of your gelcoat, if necessary. Most gelcoat pastes are available in white or neutral colors, but straight out of the can they rarely match aged gelcoat. Remember, gelcoat can change color slightly as it hardens, so to match it exactly you'll need to mix a test batch or two, allow it to harden on a piece of cardboard, and then compare the final color against your existing gelcoat. Also remember that the new gelcoat will fade at a different rate than the rest of the boat, and a few years down the line, the difference may become visible. When you're satisfied with the color match, mix a final batch and use it to fill the cracks and cover all sanded areas. Make sure no air bubbles or gaps are left in the cracks, and use a plastic resin spreader, putty knife, tongue depressor, or similar object to smooth out the surface.
When you're satisfied you have a good, smooth surface, cover it with a piece of plastic wrap to allow it to cure completely. (Some gelcoat repair kits will include plastic film for this purpose because gelcoat paste must be sealed off from the air to cure 100 percent).
Caution: Always ensure adequate ventilation when working with fiberglass gelcoat — the fumes may be harmful!
-
STEP 6: Finish The Surface
After the gelcoat has cured, wet-sand it with fine 220- to 240-grit sandpaper until the surface is almost completely flush and smooth; then gently wet-sand it with a super-fine 400-grit sandpaper, and finally, with ultra-fine 600- or 800-grit sandpaper. Clean the surface, then wax and/or polish it with the same product(s) you use on the rest of the boat. Then stand back and admire your work. Good job! You've made your boat look better, and prevented potential future problems at the same time.
Tech Support
Degree Of Difficulty
Tools
- Dremel
- Cone- or bullet-shaped silicon carbide or tungsten carbide Dremel bit
- Sanding block
- Plastic resin spreader or putty knife
Materials
- Solvent wash (such as acetone or Interlux 202) $19
- Rags $3
- Medium 60- to 80-grit sandpaper $2
- Fine 220- to 240- grit sandpaper $2
- Super-fine 400-grit sandpaper $2
- Ultra-fine 600- to 800- grit sandpaper $2
- Gelcoat paste and hardener $30
- Coloring agent (as necessary) $10
- Assorted mixing sticks and containers $3
- Plastic wrap $0
Project Cost
$73 (based on West Marine pricing)
Approximate Yard Time/Cost
The time required for this job will obviously vary quite a bit depending on the number of cracks and how widespread they are, but should take no more than three hours per square foot of repair area. Fiberglass repair costs between $60 and $110 per hour in a yard, so you'll save $180 to $330 by doing the job yourself.
BoatUS Members save at Boat Shows
Make sure to mark your calendars for two exciting events! BoatUS Members save 25% with code BOAT24US.