Advertisement
There's a reason your boat has rub rails and it's because the world isn't perfect.
If you've taken that all too common walk around your boat and trailer, noticing what another year has done to the prop or the bottom paint or the hull, then you've no doubt noticed the beating taken by your boat's rub rail. This quiet unassuming fixture takes the first hit when the boat touches a piling or, if no fenders are used, another boat. After a while, the rub rail's appearance suggests the time has come for a change.
Plan on an afternoon to bring about that change.
"Installing a rub rail is relatively easy to do," says technical advisor Hank Ingenito of D.I.Y. Marine, "but preparation is key to doing it well. This isn't a project you can keep walking away from to get another tool and complete in a few hours." Everyone who has done this job by themselves says the next time they'll have a friend lend a hand...or both. It makes the job go easier (and faster).
Rub-moval
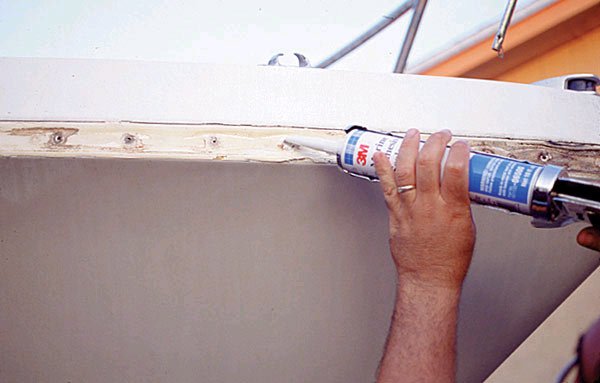
First, though, a little about removing a rub rail. Boat manufacturers work long hours to make their designs different from competing models. This means, unless you can order the same rub rail from the factory that built your boat (and in many cases, this is possible to do), you should accept the fact the new one may not look like the old one. That's not a worry. Experts stress, however, that the replacement has to have at least the same height as the old rail. If it doesn't, parts of the hull will be exposed that weren't before the job began. And considering the banging taken by a boat as well as the amount of water the exposed surface comes in contact with, this is a situation best avoided.
"Depending on the look you want," says Ingenito, "rub rails are interchangeable." They are typically available in four different materials: aluminum, rigid vinyl, semi rigid vinyl and stainless steel. Remember you are going to need to buy rub rail using this formula: twice the length of your boat plus the beam plus at least two feet.
Removal of the old rub rail should begin at either the bow or the stern where the beginning and end pieces are found. With a slotted screwdriver, pry off the insert and pull it out of the track. Next, remove all the fasteners (screws or rivets). If rivets have been used, it will be necessary to drill them out with a bit of equal or slightly smaller size. (Some rails won't have an insert.) Once the rail has been removed, scrape the surface to remove excess sealant.
It is important to fill the holes that held the screws/fasteners/rivets with sealant such as 3M5200. Do not use the same holes to attach the new rub rail because the integrity can't be trusted. Before drilling new holes, let the sealant cure. Drying time will be dependent on the temperature and the product. New holes will need to be drilled every 6"-8". Some of the rub rail replacements will have holes pre-drilled so it will be necessary to line up the new rail on the hull so as not to drill into an earlier hole. This is also the point where you need to look at how the old rub rail was attached.
If the rub rail ends were clipped together on the bow, avoid making the same mistake. Instead, line up the rub rail so that the center of the bow is completely covered, securing it with screws through the holes on either side. "I've seen some rub rails put on with the ends right on the bow and that is something you want to stay away from." says Ingenito. "It's just not a good idea because the bow is a point of stress on any boat and it's going to be weakened by screws."
Those installing rub rails for a living suggest placing the middle of a section so that it wraps around the bow. Predrilled screw holes in the new rub rail should be located three inches on either side of the bow (if using holes every six inches).
Advertisement
The Rub: On Screws and Lubes and Metals
To ensure a snug fit around the boat, use a drill bit that is slightly smaller than the screws you intend to use. Ingenito recommends using Phillips head screws when installing a new rub rail. "They are by far, easier to put in than the blade type screw," he says, "and with a Phillips you have three or four places to ensure a secure fit with the screwdriver. This isn't an area where you want any stripped screws that can't be removed or, for that matter, tightened." In addition, apply some of the sealant to the screw threads before inserting into the hole. One more piece of advice for the rub rail installer: a cordless screwdriver is worth the investment on a job like this. Need a reason? Let's say your boat is 22 feet long. That's 44 feet of rub rail with an eight foot beam (approximate). This means you have 52-feet of rub rail using six-inch centers which results in using 104 screws. One other suggestion: use two screw guns because one person can be drilling the new holes while the other is inserting the new screws. With only one tool, you are going to be changing from screw driver to drill bit and back all afternoon.
Bending a rigid vinyl rail around the corners on the transom is going to require the careful use of a heat gun. If this isn't available, a portable hair dryer can be used but it will take longer to heat the material. If you are installing a stainless steel or aluminum rail, use a rubber mallet together with hand pressure until the rail conforms to the desired shape.
Many rub rail designs require the use of a rubber, vinyl or even metal insert into the frame that has already been secured to the boat. The insert will bear the impact of the boat coming in contact with a piling or pier or dock because it sits highest on the rub rail track. The trick here is going to be getting the insert into the track. This is done by squeezing (a heat gun is helpful here), it into position. It is also helpful to use liquid soap on both the insert and the track to move it into place. Having the soap in a spray bottle works best. Some people simply use a soapy rag and wipe the track and insert. You will have to pick the method that works best. Whatever method is chosen, be aware you may have to use a heat gun on the track surface to increase the temperature if working outside in cold weather.