Advertisement
The discovery of hull blisters elicits a mental "oh no!" from most boat owners. But in many cases, the solution is simple and inexpensive.

Don't let a few blisters on your hull intimidate you this spring! (All illustrations: ©2013 Mirto Art Studio)
Most of us react emotionally to the slightest blemish on our hulls, and blisters often announce themselves as lots of blemishes. Those little bumps become a source of worry, even dread. Why my boat? How much time do I have before hull integrity is compromised? If I spring for a "cure," how many thousands of dollars will it cost? Take a deep breath: Blisters are a symptom, not a disease. It is estimated that one in four fiberglass boats develops hull blisters. Most will never be more than a cosmetic concern, particularly if they're treated rather than ignored.
Fiberglass hulls blister because the shiny exterior, the gelcoat layer, is not 100-percent impermeable to water. Seeking equilibrium, the water on the face of the gelcoat is drawn to dry voids on the back side — air pockets in the original lay-up or adhesive failures between laminates (particularly between the gelcoat and first layer). This attraction is intensified by loose soluble materials in the laminate, with which the water combines into larger molecules, too large to pass back through the gelcoat. Worse still, the solutions created are acidic, which can attack the resin and release more soluble material that attracts yet more water. The pressure that necessarily builds is released by expanding the volume of the void, pushing the gelcoat into a dome.
Blisters might signal a major defect due to either inferior materials or poor techniques when the hull was built, but absent a blistering history with other boats from the same builder, you should be slow to draw such a dire conclusion. Blisters also occur because an inattentive worker may have failed to apply the gelcoat uniformly; because fluctuations in the mix from the resin sprayer may have created spots of soft gelcoat; because features in the mold may have induced thinner coverage; because the gelcoat may have been sanded to excess by the owner or yard; because chemical stripper may have been used on the bottom; because contaminants in the water may have attacked the gelcoat; or a dozen other reasons.
No one looking at a bottom with a few blisters can tell you with certainty the cause, the gravity, or the most appropriate treatment. For that reason, a bit of wait-and-see when blisters are first discovered is likely to be the better and often the least costly course, particularly if your boat spends time out of the water.
That doesn't mean you should simply ignore a few blisters. To the contrary, the acid pus they can contain is not doing the laminate any good, no matter what the cause, so blisters should be attended to as soon after discovery as practical. But ignore advice, whether well-meaning or avaricious, that you must immediately strip all the gelcoat off the bottom and replace it with different barrier coat. That might turn out to be exactly the treatment your boat requires, but it also might not. If your boat comes out of the water covered stem to stern with blisters, you're going to need the advice of a professional, preferably one without a conflict of interest. However, blisters develop slowly, laminate damage slower still, so if the bottom exhibits a few blisters, whether in a cluster or scattered, initially treat them individually.
Repairing individual blisters also cures them. The objective of replacing all of the gel-coat is to inoculate the entire bottom against future blistering, but if 99 percent of the original bottom is already resisting blisters, that makes 99 percent of your investment wasted. Individual blister repair is where to start until it becomes clear whether your bottom has pimples or pox.
Tech Support
Degree Of Difficulty: Moderate
Tools and Materials:
- Chisel
- Disc sander
- Water hose and nozzle
- Scrub brush
- Scotch-Brite scrubber pads
- Sanding block
- Disposable natural-bristle paintbrushes
- Isopropyl alcohol
- Freezer bags (or other thick clear plastic)
- Duct tape
- Epoxy (West 105 or equivalent)
- Colloidal silica (West 406 or equivalent)
- Fiberglass cloth (6-10 ounces for large blister)
Find And Grind
Blisters can deflate in as little as an hour after a boat is lifted from the water, so it's best to examine the bottom immediately to avoid drawing a false conclusion. Even after shrink-in, blisters will normally be higher than the surrounding surface. If you're not there for the haul-out, a useful trick later is to scuff the bottom lightly with a coarse sanding block to locate and mark high spots.
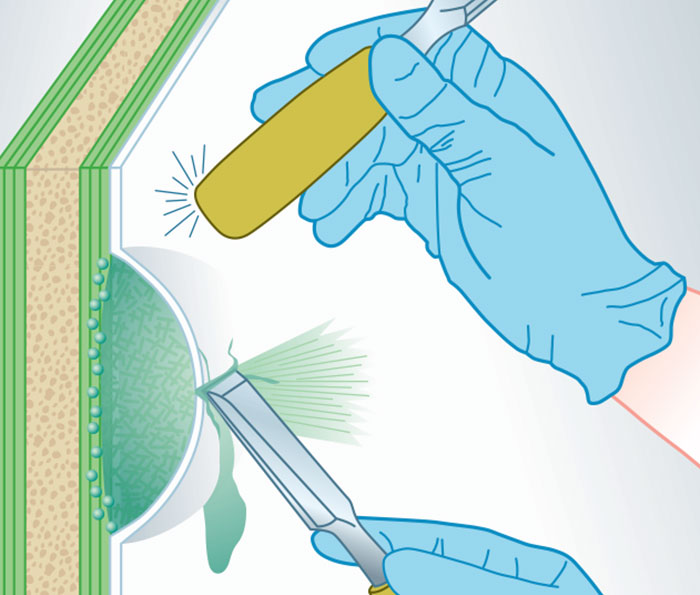
Figure 1: Break open each blister.
There's nothing complicated about blister repair. It starts with breaking open every blister. Pressurized acidic liquid often sprays out, so wear eye protection and use the corner of a sharp chisel at arm's length (Figure 1). Damage can extend beyond the dome, so reverse the chisel and use the handle as a plastic mallet to tap the laminate all around each blister or blistered area. Solid laminate will sound sharp, voids will sound dull. Mark the perimeter of suspect areas. After all blisters are open, wash the hull to flush away acidic trickles.

Figure 2: Grind away the broken dome of the blister.
Once the hull dries, grind away the remains of the broken dome with a two-inch sanding disc (Roloc) or some other sanding or grinding bit in a drill or rotary tool (Figure 2). Chamfer the perimeter of every blister to transform it into a shallow dimple. Typically you'll be removing only gelcoat, but if you discover damaged laminate, you'll need to grind this away until you reach healthy laminate. Wetting laminate with a trigger sprayer can help you to differentiate. Damaged or dry laminate will show white fibers while healthy laminate will appear dark and translucent with the fibers not evident.
Whether a depression ends up spoon-, saucer-, or plate-size will be determined by how far out you have to grind to encounter a solid bond between gelcoat and laminate. Anywhere the exposed edge exhibits separation between gelcoat and laminate, keep expanding the perimeter. Open any separate voids your sounding discovered and treat these the same way as a blister, dishing them into shallow depressions.
Know Your Enemies
Figure 3: Scrub until squeaky clean with a stiff brush.
Loose debris is one enemy, so scrub the prepared blisters squeaky clean with a stiff brush and plenty of water (Figure 3). Another enemy is moisture. If you've waited to do the job after hauling the boat for the off-season, this is where to stop. By waiting to fill the blisters right before you launch next season, you take maximum advantage of the potential for the exposed laminate to dry out. But if the boat isn't going to stay out of the water, you'll need to dry the laminate before filling the blisters. Grinding will remove much of the wettest material. Blot-wiping each cavity with isopropyl alcohol-soaked paper towels will draw out much of the remaining moisture. Completely wet the laminate with rub-big alcohol, then wipe away contaminants it brings up. Repeat with soaked, fresh paper towels until they come away clean.
Normally this will leave the cavity both clean enough and dry enough to fill, but you can check for moisture content by taping squares cut from zipper freezer bags over a few of the blisters. Seal the entire perimeter of the clear plastic squares to the hull with duct tape, and then take a three-day break. If the weather is warm enough for a sensible person to be working on a boat and there's still moisture in the laminate, it will con-dense onto the inside of the clear plastic. In the likely event that the plastic is dry, you're good to go. If it's fully coated with condensation, your repair will benefit from giving the open blisters at least a couple of low-humidity weeks to dry out.
Get Your Fill
When you restart the repair, whether after a few days or a few months, vigorously wash the blisters a final time using a stiff brush and as much water pressure as you can bring (Figure 3). This is to flush away any contaminants that drying has brought to the surface. It will not raise the water content of the laminate.
The only resin choice for individual blister repair is epoxy resin, and not the kind hang-in on the pegs at your local hardware store. You need a high-performance epoxy such as West System 105. If the ambient temperature allows, use the regular hardener (for example, West 205), which delivers slightly better moisture exclusion than a slower hardener. You'll be filling the blisters in two or perhaps three steps, and it's essential that each happens before the previous application reaches full cure so that they join together chemically.
You should initially attempt to fill just a few blisters to get a feel for how long each step requires and how much curing time to allow.
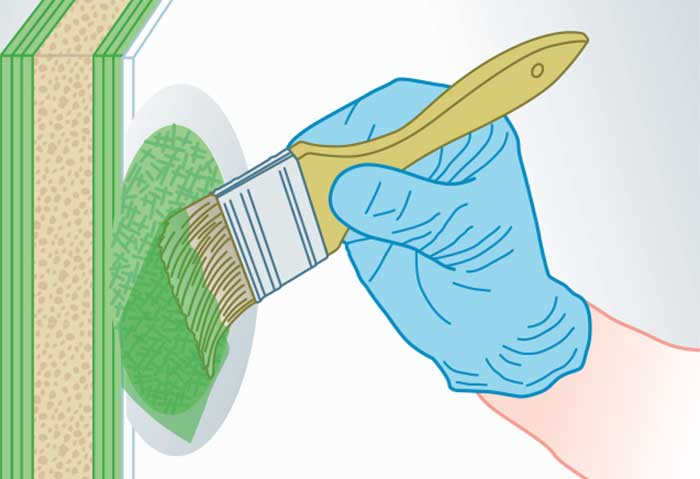
Figure 4: Paint the inside of each cavity with epoxy resin.
The first step is to mix up a small amount of epoxy without any additive. Using a small disposable brush, paint the interior of each blister cavity with the epoxy (Figure 4). It is this coat that forms the bond with the existing laminate, so you want the epoxy to completely saturate fibers and penetrate pores and crevices. If you go immediately to the next step, your filler is going to skid on the wet epoxy and slide out of the cavity. To avoid this, wait up to an hour to allow the wet-out coat to partially cure. When it has stiffened but remains tacky, the blister is ready for filling.
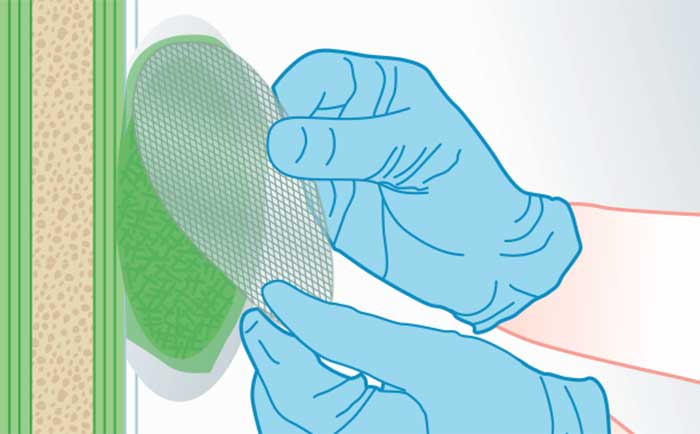
Figure 5a: Replace fiberglass as needed.
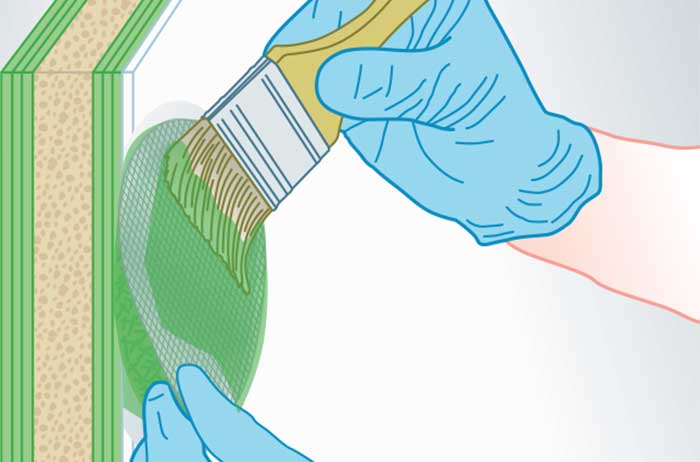
Figure 5b: Then, saturate the cloth with epoxy resin.
Thickened epoxy resin alone is suitable to replace the gelcoat and the first layer or two of the underlying laminate, but where a blister involves deeper layers, it's good practice to replace the fiberglass reinforcement that you ground away. It's not necessary or even particularly desirable to try to match the original lay-up schedule when repairing blisters. Binders in fiberglass mat often make it incompatible with epoxy, so the best choice is six- to 10-ounce fiberglass cloth. Cut the cloth into discs slightly larger than the flat part of the depressions and press them into the tacky wet-out coat. Saturate the cloth with epoxy resin, thickening the resin slightly with colloidal silica if you experience difficulty with the resin draining out of the weave. Add and saturate as many layers of cloth as necessary to restore the laminate to its original thickness (Figure 5). Allow this lay-up to cure for around 30 minutes before filling the remainder of the cavity with silica-thickened epoxy.
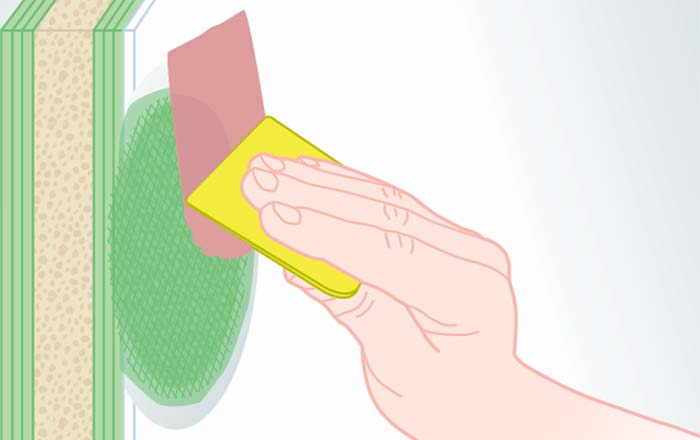
Figure 6: Trowel the filler into the cavity, smooth it, and then fair it.
For this you want to again mix up a small amount of epoxy resin, and then stir in colloidal silica (West 406, Aerosil/Cabosil, for instance) to thicken the resin to the consistency of creamy peanut butter. The filler in this case is also the barrier coat, and colloidal silica will not compromise the resin's resistance to moisture penetration. Use a flexible plastic spreader to trowel the filler into the cavity and smooth and fair it (Figure 6).
Learn to curve the spreader with thumb pressure to copy any curvature of the hull, and take extra time to try to match the surface of the fill perfectly to the hull. As colloidal silica makes the cured filler resist sanding, extra time here pays generous dividends. Epoxy does not shrink, so there's no need to overfill. A topcoat of unthickened resin after partial cure of the filler can improve the fairness of the repair.
The Final Hurdle
That's it! Let the epoxy cure overnight, then use a Scotch-Brite pad and plenty of water to remove the waxy amine coating. Follow that with a bit of block sanding with 100-grit paper to fair and scuff the surface of the epoxy, and you're ready for bottom paint. Fixing existing blisters is the first step toward figuring out whether a more extensive and vastly more expensive repair will be required. At the very least, repairing individual blisters puts off a more costly response for another year. At best, it avoids that expense altogether. Repairing a few new blisters every year can be a low-cost, long-term strategy.