Advertisement
Once you've picked the appropriate sealant, success depends upon paying close attention to the details.
There was a time when re-bedding a cleat meant stopping in at the chandlery for some marine sealant, unbolting the fitting, squeezing some goo in all the right places, and tightening the bolts. Presto, no more leak! But much has changed. We have more sealants to choose from, and you have to pick the right one if you hope to keep that fitting watertight and still be able to remove it if necessary. Most middle-aged and newer fiberglass boats are constructed with a core of lightweight material between two fiberglass skins. If you don't take care to seal that core, water can get into it and cause core failure and, eventually, delamination. Doing it right isn't difficult; it just takes a bit of knowledge, thought, and attention. Here's how to go about it.
Set The Stage
A good bond begins with clean, wax-free surfaces. Use solvent to remove fabricating or preserving oils from new hardware. Clean away dust created by drilling. Use a wax-removing solvent (xylene, toluene, or acetone) to clean the fiberglass. Solvent-wipe the barrels of the bolts you'll be using.
If you're re-bedding, hopefully the old sealant is one that will allow you to separate the joint without difficulty or damage. With the hardware loose, remove all traces of old sealant from it and the boat, typically by peeling it with a razor scraper or a chisel (Figure 1) followed by a solvent wipe. Where you fail to remove old sealant, the new sealant will attach to it, not to the boat. That makes the new seal the same as the old one and your effort wasted.

Figure 1
If the old sealant was silicone, it will leave behind a stubborn residue. Xylene (xylol) is the best solvent for dissolving silicone, but wiping with a xylene-saturated rag just spreads the contamination. Instead, wet the surface with xylene, then blot-wipe it using a single, short sweeping motion with a clean paper towel. Use each paper towel only once, and use as many paper towels as necessary. Test for silicone or wax contamination by misting the surface with water. If it sheets away, the surface is clean. If it beads, the surface requires additional cleaning.
Core Concerns
Find out if the deck (or hull) around fastener holes is solid laminate or some type of core material sandwiched between fiberglass skins. If the spot where your hardware will be mounted is not solid fiberglass, depending entirely upon a flexible sealant to prevent water from penetrating the core is a high-dollar sucker bet. If you drill the fastener holes, examine the dust the drill brings out for a change in color and/or texture. To evaluate existing holes, you need a bright light and a straightened wire paper clip. Poke around at the inside surface of the hole. Fiberglass will repel the wire, but it will burrow into or flake soft core material. Nearly all fiberglass boats incorporate core to stiffen decks and many also use core in the hull, so expect to find core.
Where the deck is cored, you need to seal off the core around penetrating holes to prevent water intrusion. One method is to dig out the core material without enlarging the holes in the skins, vacuum out the loose debris, and fill the cavity with epoxy. However, bits of core may remain attached to the inside surfaces of the skins, providing a wicking path for moisture when the holes are re-drilled. An easier method, and the one I've come to prefer, is to drill the hole 1/8-inch oversize (Figure 2), fill it with epoxy, then re-drill the hole through the center of the epoxy plug. Done with precision, this creates a .006 inches epoxy barrier between the hole and the core material, and the epoxy bonds to surfaces perfected by the drill cut.
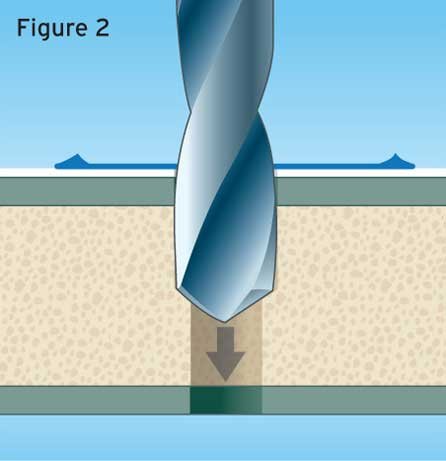
Figure 2
Of course, you can also dig out additional core to thicken the barrier and reinforce the deck. Use a reaming tool made from a bent nail or an amputated Allen wrench chucked into a variable-speed drill to pulverize a soft core material like foam or balsa (Figure 3). If the core is plywood, you'll need a thin-shank cutter of some type in a rotary tool. If you're installing your hardware with screws into the fiberglass, rarely a good idea, the epoxy barrier will need to be thick enough to accommodate the cut of the threads.

Figure 3
Once the hole has been drilled and cleaned, close the bottom of the hole with tape (putty or clay works well, too) and generously mask the top surface to avoid additional cleaning and sanding. Fill the cavity with epoxy (Figure 4), allowing it a minute or two to saturate the exposed core. Drain or suck out excess epoxy (Figure 5), thicken it slightly with colloidal silica or microfibers to strengthen it, and inject it back into the hole until it overflows onto the masking tape (Figure 6). Churn the epoxy with your paper clip to vent trapped air (Figure 7). Give it time to fully cure, then re-drill the mounting holes through the epoxy grommet you've created (Figure 8).
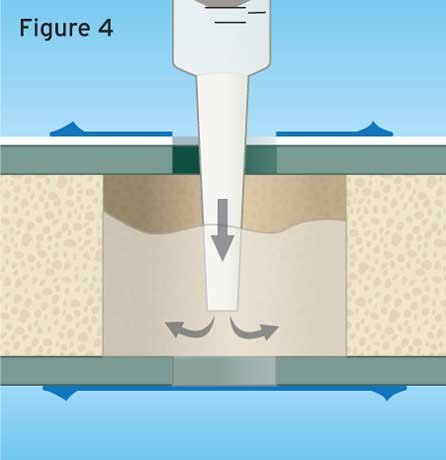
Figure 4
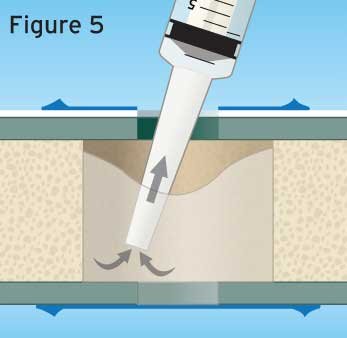
Figure 5
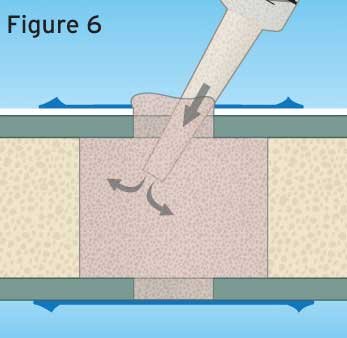
Figure 6
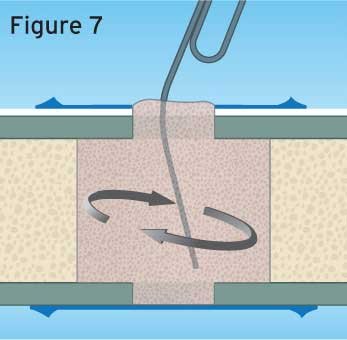
Figure 7
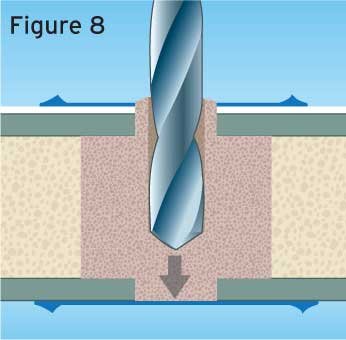
Figure 8
"Chamfer" The Holes
To give your bedding effort a better chance of long-term success, chamfer (bevel) the mounting holes with a countersink bit (Figure 9). This prevents squeezing out all of the sealant by over-tightening the fastener while compressing the sealant, creating a sort of O-ring. In addition, the thicker the sealant, the more it can stretch without rupturing, so the heavy band of sealant where the fastener passes through the deck will absorb more movement before failing.
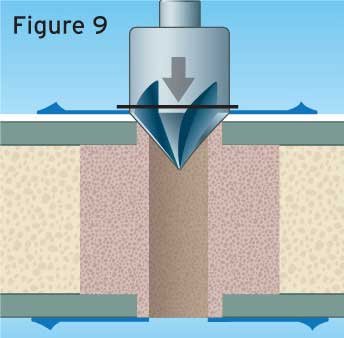
Figure 9
Chamfering also separates fragile gelcoat from the fastener, transferring all of the strain to the stronger laminate. To avoid chipping the gelcoat while countersinking, run the bit in reverse. Where you have sealed the core with epoxy, take care not to make the countersink so deep it compromises the bond between the epoxy and the top skin.
The Main Event
Finally it's time to apply the sealant ... or almost time. Never apply sealant without first doing a dry fit of the hardware being installed and all of the fasteners, not just one or two. Mounting holes often end up a bit off in location or angle; you don't want to discover this after applying half a tube of aggressive goo. Make sure the hardware sits square and flat. Make sure all of the fasteners go in straight and seat fully. Check the fit of the backing plate. Start the nuts to make sure the threads are undamaged.
Once you're satisfied that everything will go together without a hitch, wipe mating surfaces and fasteners one last time with acetone on a clean rag to remove body oils and other contamination that may have occurred during fitting. The discussion that follows applies to traditional curing sealants. If you're bedding with butyl tape, see; "Boat Sealant".
Cleanup of curing sealants will be easier if you mask the deck around the hardware as well as the top of the base. As a rule, it will be less messy to apply a curing sealant to the deck rather than to the hardware. Employ the sealant liberally; what you don't use is likely to go bad in the tube or cartridge anyway. Fill the chamfer of each hole with a circle of sealant, and then cover the entire mating surface with sealant using the nozzle or a tool to achieve a fairly uniform coating. Position the hardware on the sealant bed with a slight twist to align the fastener holes. Put a ring of sealant just below the head of each fastener as you insert them.
Below deck, wipe away any sealant the fasteners push through. When bedding fails, you want it to announce itself with a leak below rather than channeling water into the core, so never use sealant on the underside of the deck. To tighten fasteners, you'll need a helper below to turn the nuts while you hold the bolts motionless. Tighten in an alternating pattern until you get a uniform bead of squeeze-out all around, then stop. Squeezing out all of the sealant defeats the purpose. Even squeezing it into a thin line reduces its strain capacity. You want the fasteners snug but not tight.
Clean away the excess sealant around the fasteners, but leave the perimeter squeeze-out undisturbed. When fully cured, trace around the base of the hardware with a razor blade. With the bead separated from the bedding beneath, it will simply peel away as you remove the masking tape, leaving a straight seal line. The less sealant that shows, the less it is subject to UV attack.
You can extend the life of the seal, particularly with silicone and, to a lesser degree, polysulfide by coming back after the sealant is fully cured and giving each of the nuts another half-turn. This reduces the amount the joint can flex and it puts the sealant under compression so that even if the bond fails, the clamped gasket will remain watertight. You must, however, take care not to turn the bolts, which will break their seal and do more harm than good.
There are a lot of steps, but none of this is rocket science. Re-bedding a deck fitting (Figure 10) is a great way to spend some time on the boat on a warm spring day before you can get out on the water. And once you're done, you'll have the satisfaction of watching a wave come over the bow or listening to rain drumming on the coach roof, knowing the water will be staying outside where it belongs.
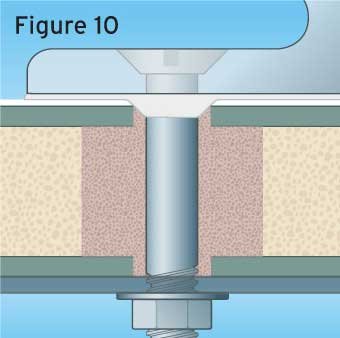
Figure 10
Tech Support
Degree Of Difficulty
Tools and Materials:
- ✓ Screwdrivers
- ✓ Wrenches
- ✓ Blade scraper
- ✓ Wire brush
- ✓ Power drill and bits
- ✓ Core removal tool
- ✓ Countersink bit
- ✓ Caulking gun
- ✓ Epoxy syringe
- ✓ Solvent
- ✓ Paper towel and/or rags
- ✓ Epoxy
- ✓ Silica or fiber epoxy filler
- ✓ Masking tape
- ✓ Sealant