Advertisement
Closed-cell foam flooring helps make boating more comfortable. Here’s how to install it on your vessel
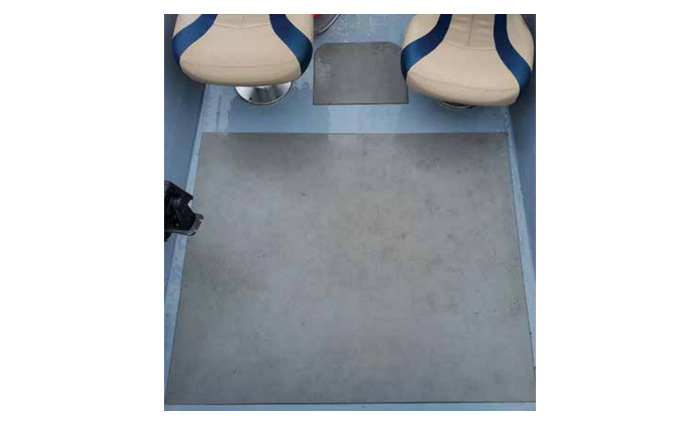
Doing a DIY job on this skiff was fast and easy, thanks to sticking with simple shapes. Photo: Lenny Rudow
Difficulty
Medium
Tools
- Straight edge
- Carpet knife
- Permanent marker
Materials
- Decking material
- Cleaning supplies
- Acetone or alcohol
- Mylar sheeting
- Masking tape
Time
A couple hours to days depending on boat size and complexity of cuts
Cost
$200/roll for 40-by-80 in. roll from SeaDek plus $30 in materials
Boat decks live a hard life. They get stepped on, spilled on, splattered on, dropped on, shoved across, and dragged over. But they make our lives hard, too. A full day of standing on fiberglass can make your feet hurt, and if the waters were rough, your spine may feel compressed – because it is. On top of that, have you ever tried kneeling down on a nonskid fiberglass deck? Ouch!
Closed-cell foam decking transforms fiberglass decks from painful to pleasurable. It can look great, is grippier than even the most aggressive nonskid patterns, and creates a cushioned cloud for you to walk, sit, or lie upon from stem to stern. It comes in a few different flavors: ethylene-vinyl acetate (EVA), polyethylene (PE), and more commonly a combination of the two. All are stain-resistant and shock-absorbing. While marketing claims abound as to which is “best,” we’ve had multiple brands – ShipsDek (shipsdek.com), SeaDek (seadek.com), and reFLEX (reflexproducts.com) – underfoot for years at a time, and truth be told, while some are softer and others are firmer, it’s often tough to tell the difference among them.
Each manufacturer offers patterns like faux teak, fish scales, and diamonds, as well as different colors and customization options. The stock material can generally be bought in bulk rolls backed with peel-and-stick adhesive, cut with a carpet knife, and applied in DIY fashion, though some manufacturers only sell through certified dealer-installers to ensure a proper application. As you might guess, having the boat templated (often accomplished via digital scanning) and the material professionally installed does result in a significant increase in cost.
In the case of a small boat or a larger boat with a rectangular cockpit, where few cuts are necessary and the shapes are simple, a DIY cut-and-stick job is fast, easy, and inexpensive. If you’re decking a 16-foot skiff or the angular cockpit of a larger boat, this would be a good option. However, the more shapes and curves you try to match, the more difficult the job will become. If you’re doing multiple compound curves and/or trying to cover items like circular access hatches, templating and router-cutting will prove far superior. In some cases (usually with very popular boat models), the decking manufacturer may already have a template for your specific model boat in their computer, eliminating the need for templating. For the purposes of this article, we’ll stick with DIY installation and assume you’re working with simple geometry. Here’s how.
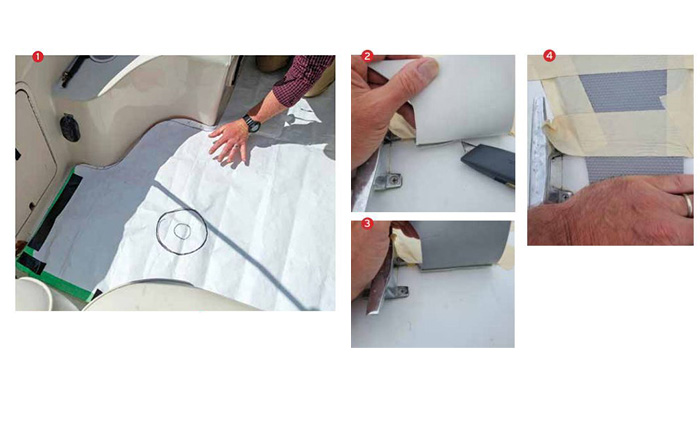
1. Mylar sheeting is great for templating projects like this. 2. With the decking half taped down, lift the free half then score the paper backing. 3. Peel off the backing from the section you’re lifting. 4. Push the exposed adhesive down and apply pressure on the entire surface area. Photos: Lenny Rudow
Feel the burn
Boaters intending to deck their boat in foam should be aware of an odd phenomenon that can occur referred to as “sunburn.” In some cases, an item such as a metal fitting or white gelcoated fiberglass surface sitting at just the right angle can reflect the sun in such a way as to melt a section of foam deck, causing it to deform. It’s relatively rare, but it does happen and generally isn’t covered under warranty. The only acceptable solution is to shift the boat’s positioning relative to the sun and/ or shade the area affected. — L.R
2. Cut the decking material. If the material is shipped on a roll, leave time to unroll it and allow the material to flatten out over several hours before cutting. If you have a (clean) patio or deck you can use, it will return to form faster in the sun and in warm temperatures.
Lay out the material over a surface that’s safe to cut on, such as a piece of plywood. Tape down the edges with masking tape to hold it firmly in place. Then lay your template over the material and use masking tape to secure it. With both secured, use the knife to cut the material along the template markings while using the straight edge, as needed, to keep your lines accurate.
3. Prep the deck. Proper deck preparation is critical and will play a big role in just how long the adhesive does its job. First, wash and scrub the deck thoroughly. Rinse it and allow it to dry in the sun. Then wipe down the entire deck with acetone or alcohol to be sure it’s 100% free of wax and contaminants. Some manufacturers recommend first wiping down the deck with an ammonia-based cleaner before moving on to the acetone or alcohol. Follow manufacturer recommendations.
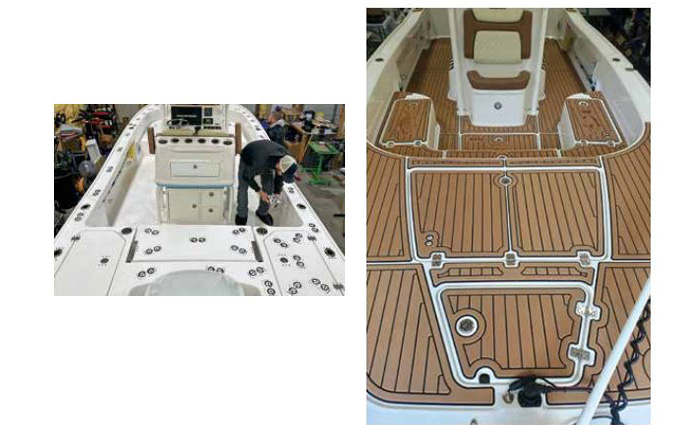
Digitally templated, computer cut, and professionally applied reFlex, installed by Brown Dog Marine, clearly has a look that goes beyond a DIY application. Photo: Lenny Rudow
4. Apply the decking. Take care with this step, because once you stick the decking, it won’t come up again – the adhesive is extremely aggressive and fast-acting.
Orient the decking in the exact position you want it. If you’re applying multiple pieces, do this with one piece at a time. When you have the decking positioned, use masking tape to secure one half of the piece only to the deck. Then, lift it from the opposite side, and using your razor knife, score the paper-like backing down the middle. Remove the backing from that half while holding it above the deck, lower the exposed adhesive side down onto the deck, and press every inch as it goes down.
When that half is on the deck, remove the masking tape securing the first half. Then lift it, remove the backing, and repeat the process on the other half of the piece of decking material until it’s completely flush on the deck. Before moving on to any other pieces, press firmly on the entire foam decking’s surface area. Be especially careful to apply pressure around the edges.
Just how long will this process take? We did a simple skiff that required two rectangular pieces and one triangular piece and completed the job in a couple hours. A 22-foot center-console decked from stem to stern with dozens of pieces and plenty of curved edges required a day and a half of work.
Once the decking is applied, cure times are quite brief, and it usually can be walked on in an hour. Or rather than walking on it, try kneeling, sitting, or even lying down. Because with that foam decking in place, your entire boat just became a whole lot more comfortable!
Myths and misconceptions
Boaters tend to be set in their ways and suspicious of anything relatively new, and like anything else, this is true of foam decking. You’ll often hear scuttlebutt about this stuff, including:
- It only lasts for a season or two. In our experience (which includes extended use of the three aforementioned brands), if the deck is improperly prepped or the material doesn’t touch smooth edges, it will begin coming up after about three years and requires resticking with spray adhesive. Properly installed, we’re in season five with no signs of the material coming loose at all. We have yet to see any signs of significant physical deterioration or damage beyond normal wear and tear. Most manufacturers offer a three-year warranty and claim a five- to seven-year lifespan, which seems entirely reasonable from what we’ve seen with multiple brands.
- Foam decking is difficult to clean. In our estimation, it’s no more difficult than trying to clean raised diamond nonskid fiberglass decking. And, like fiberglass, common stains like fish blood and leaf marks tend to bleach out in the sun after being scrubbed.
- Darker colors are hot to stand on in bare feet. Absolutely false. We’ve had teak, gray, and gray/black, and no one has ever so much as mentioned it being hot underfoot. — L.R.