Advertisement
You most appreciate the importance of your outboard or sterndrive tilt and trim feature when it fails. Here are commonsense tips to help when your tilt and trim unit doesn’t.
Tilt and trim systems allow you to optimize performance of your boat by adjusting the angle of the engine, which in turn adjusts the running surface of the boat’s hull while on or attempting to get on plane. The ability to trim your engine improves boat performance under a wide variety of conditions, from smoothing out a rough ride in heavy seas to reducing draft in shallow water, as well as when fine-tuning the boat’s hull trim for speed and maximizing gas efficiency. While this article focuses on the tilt and trim system for outboard engines, much of the information provided can also be used when troubleshooting sterndrives.
There are two main types of tilt and trim systems found aboard recreational boats: Older systems often used an electric tilt motor coupled with a mechanical lifting device (a worm gear for example). The most common system in use today, however, is the electric/hydraulic power tilt and trim system. It consists of three primary components – an electric motor (12- or 24-volt DC, depending on the system), a small hydraulic pump, and a reservoir/assembly unit. The electric motor operates the hydraulic pump, which in turn forces fluid to the cylinders or rams to move the motor up or down for trimming and trailering.
If your tilt and trim unit fails to operate, the following troubleshooting steps should help identify the problem, or at least point you in the right direction. As these tips are pretty generic in nature, you should be able to apply them to most any tilt/trim system. The first step is determining whether the problem lies with the electric tilt/trim motor or the hydraulic pump/assembly. Here are a few simple ways to isolate the problem.

Electrical or tilt/trim motor issues
If you try to raise or lower the engine and nothing happens, first check that your battery is fully charged and that the battery switch is in the “on” position.
Next, listen for the solenoid/start relay (Photo 1) while operating the helm control (tilt) switch up or down. If you hear nothing, the problem will typically be with the tilt switch, solenoid, or with the wires or connections between the two. Depending on the system, a blown fuse is also a possibility, so check any fuses first as part of your initial checks (and always carry spares).
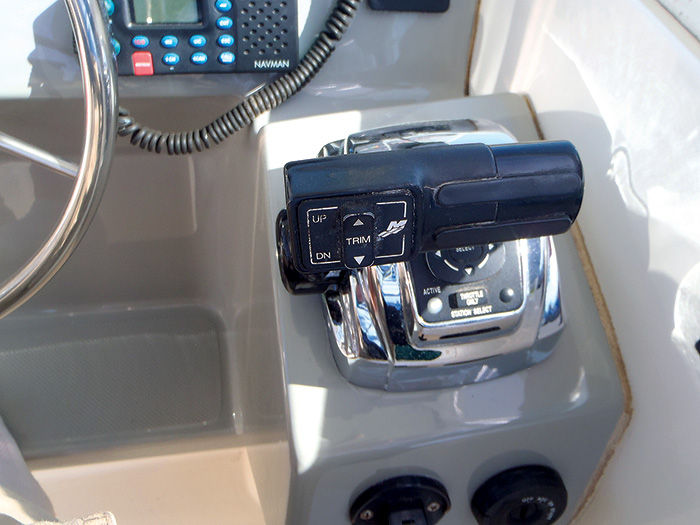
If your engine has an integral tilt/trim switch, test operation of that next (Photo 2). If the tilt/trim function is operational using the integral switch, that proves the tilt/trim system itself is functional and that the problem lies with the helm switch or its associated wiring and components. If you hear a slight clicking noise while pressing the helm tilt/trim switch, that means you have power from the control switch to the solenoid or relay. The next step is to check operation of the power tilt and trim motor itself.
Most tilt and trim systems use a 12-volt DC reversing type motor, which will typically have one green wire and one blue power wire (Photo 3). If you’re dealing with an older system, the motor may also have a black third wire, which is used to provide ground to motors that don’t receive it through the motor housing via the engine chassis.
Applying power to the blue wire raises the engine, while energizing the green wire lowers it. An easy way to remember this is the phrase “blue sky, green grass” (as in the blue wire raises the engine toward the sky; the green wire lowers it toward the ground).
To test the motor, first remove power to it by disconnecting the blue and green wires. Unplug the quick-disconnect plug between the motor and solenoid (if one is provided) or disconnect the two wires where they connect to the solenoid or relay. Once disconnected, use a jumper wire to apply 12 volts DC directly to the appropriate wire. If the engine is in the down position, energize the blue wire (which should raise it). If in the raised position, connect the jumper to the green wire to lower it.
To avoid sparks, secure power to the system by turning off the battery switch before disconnecting and connecting wires or making jumper connections. Additionally, make sure your work area is well-ventilated and there are no gas fumes present.
If the motor fails to operate with power applied directly to the blue or green wires, the issue lies with the motor (Photo 4). If the motor operates, then the problem is a lack of power to the motor (faulty solenoid or relay, bad connections, etc.). Failed solenoids, relays, and corrosion at connections, relay sockets and quick-disconnect plugs are some of the most common problems associated with tilt and trim system failure.
Hydraulic pump assembly problems
If the tilt and trim motor works fine, but the engine won’t raise or lower, leaks or settles down when in the raised position or won’t stay trimmed, chances are the problem is with the hydraulic pump or valve body assembly (Photo 5). Start by checking the hydraulic fluid reservoir level. Hydraulic fluid doesn’t evaporate, so a low fluid level indicates a leak in the system hoses, fittings, or seals. While you’re in there, check the reservoir for the presence of water, which can also cause a lot of issues, even if the system appears to operate normally.
A common place for leaks to occur are the tilt and trim ram seals (Photo 6). Seals can fail for numerous reasons, from dry rot (due to age and UV damage) to corrosion or pitting of the rams, which then damage the seals during operation. UV-damaged seals can simply be replaced, but if the rams are pitted, the only way to really fix the problem is to replace both the seals and rams (as damaged rams will simply continue to ruin newly installed seals).
If the hydraulic fluid level is good, the problem is most likely with the hydraulic pump. At this point, repairs typically involve removal and replacement or possibly rebuilding by a qualified repair facility.