Advertisement
Trust us when we say having an MFD at a second station can bring navigational nirvana – and help anglers catch more fish!

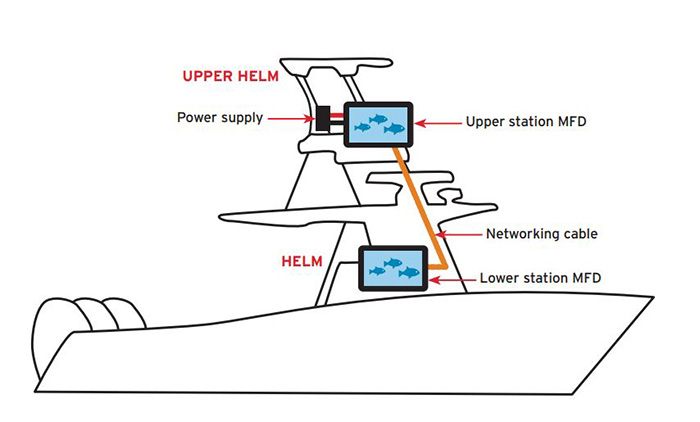
The MFD installed on the half-tower of this fishing boat will enhance both the captain’s navigation and angling opportunities.
Difficulty
- Moderate
Tools
- Jigsaw and saw blades
- Power drill and bits
- Wire crimper/stripper
- Wire fish
Materials
- MFD, required networking cables, and network hub (if necessary)
- Mounting template and hardware
- Clamshell fitting (if binnacle mounting)
- Flush mount bracket or kit (if necessary)
- Crimp connectors
- Terminal connectors
- Masking tape
- Silicone sealant
Time
- Varies
Cost
- MFD cost, plus around $20 in mounting supplies
Having a second steering station on your boat can be incredibly helpful. In many situations it can assist with docking, improve visibility when running the boat, and if that additional station is on a flybridge or tower, allow you to cruise in the open sunshine with the wind in your hair. But boats that leave the factory with an extra wheel and throttles aboard don’t necessarily have navigational electronics and/or fishfinders mounted next to them.
An electronics-free second station means you’ll be digitally blind when you use it. Worse, if you’re an angler, the lack of having a fishfinder to glance at may well discourage you from using the second station in the first place. Who wants to be trapped in the cabin or under the hard top simply because you know your catch rate will fall if you can’t see the LCD? No one. Fortunately, installing second station electronics is not an incredibly complex job. Ready to get started?
- 1. Identify the exact networking needs for your system. Every electronics system is a bit different, and many can be networked in multiple ways. That’s why we put the “if necessary” after mentioning the network hub. In some cases, you’ll need it; in some cases, your system may already incorporate a hub; and in others you may be able to get the primary and secondary station MFDs talking to each other merely by linking them via a network cable. You’ll need to research your own specific system requirements and obtain the appropriate parts to ensure that the MFDs will be able to share data with each other.
Some network connections are made via a Cat or RJ45 cable, but never substitute the electronics manufacturer’s specified cable for the (less expensive) standard-issue stuff. Standard cables designed for use in the home or office aren’t waterproofed at the connections, while cables from the manufacturer of a marine MFD should be waterproofed and IP-rated. Get these cables directly from the MFD manufacturer and follow the installation instructions exactly. (Those instructions are almost always available online and found with an internet search or on the manufacturer’s website.)
- 2. Locate the ideal mounting spot. Flush- or binnacle mounting are both options, but if the second station is exposed to the weather (as many are), you’ll want to invest in a full cover (beyond the screen cover that comes with the unit) on a binnacle mount to protect the exposed back of the unit. As a rule, flush-mounting and using a screen cover are preferable.
Primary considerations are that it’s easy to reach and view, and less likely to be blocked by other items on the second station, such as a throttle or steering wheel. Before installing, it’s critical to inspect the area behind the mounting position to ensure there are no wires, cables, or other important items behind it that you could inadvertently drill into or cut.
If binnacle mounting, after locating the mount’s ideal position use masking tape to hold the mounting template in place, then drill the mounting holes. Next, drill an access hole for the wires to pass through.
If flush mounting, after locating the unit’s ideal position, tape the mounting template in place. Then use your drill to create a pilot hole for the saw blade. Insert the blade and cut out the opening.
- 3. Run the wires. You’ll need to run both networking and power wires to the second station. In some cases, the second station may have a bus or breaker bar that can be used for the power supply; in other cases you’ll have to run power lines to another power supply.
For both sets of wires, you may need hardtop support pipes, a tube, or some other form of wire chase to get the wires from point A to point B, depending on how your boat is designed and built. You may find that the manufacturer left a pull-string to help wire the second station, but, in many cases, you’ll need to use the wire fish to install your own pull-string, then use it to pull the network and power cables through.
Running wires through pipework or tight chases can be extremely difficult, especially if the wires have large-diameter plug-ends. Fishing through a pull-string, then using it to pull the wire, is usually much easier than trying to fish the wire itself. Looking for the path the manufacturer took to run steering and throttle cables and/or wires to the upper station is a good place to start and is usually going to be the best option. You may find other places wires can be routed, but in some cases, you may need the help of a pro to complete this stage of the process.
Once the wire(s) are through, attach the network cable to each unit or to the network hub, as applicable. Using your crimpers, crimp connectors and terminal connectors where appropriate to connect the power leads to the bus or breaker bar.
- 4. Mount the unit. With the wires in place, you can plug them into the unit, then finish mounting it. If binnacle mounting, after running the wires through the access hole, install a clamshell mount to protect the opening. Secure the binnacle in place using the mounting hardware, sealing the holes with silicone sealant. Finally, seat the unit in the binnacle mount.
When flush mounting, run a bead of silicone sealant around the perimeter of the cutout and around the back of the unit where it will seat on the fiberglass. Put the MFD in place, then secure it using the mounting hardware. In some cases, you may have to remove a bracket from the face of the unit to access the mounting holes, or you may need a flush-mount bracket kit designed for flush mounting your specific unit.
- 5. Set up the network. You may have noticed we’ve run through all the materials and tools. That does not, however, mean the job is finished. Once the hardware is in place, turn on the units and “tell” them to talk to each other.
How this is accomplished differs depending on the manufacturer and model line of the MFDs. There is often a communications or network setup page where you can assign data sources, set units to share data to the network, and/or change factory defaults that were originally intended for single-unit use. Look up the parameters specific to your MFDs.
Just how much of a time investment this job will be can vary radically depending on the size and nature of your boat and where the control stations are located. Some might be easy to accomplish in an afternoon; others could require days of work. Either way, one thing is for sure: Whether it’s in the cockpit, on a flying bridge, or in a tower, having electronics at that second station is bound to make you a happier boater!