Advertisement
While most people consider these modern marvels to be ‘maintenance-free,’ that’s not quite accurate. Here’s what you need to know to help keep them operating well
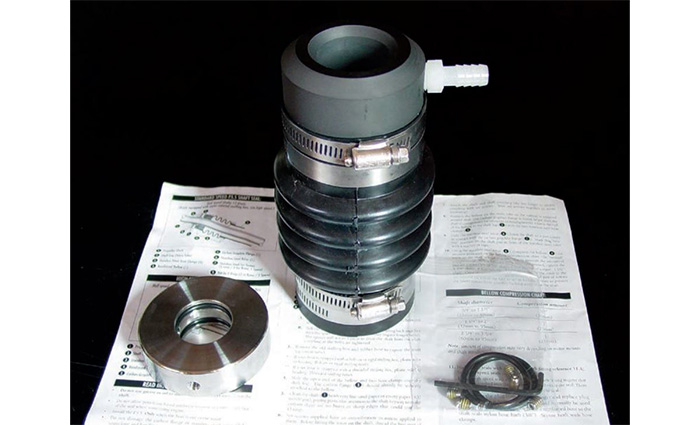
Photo: Frank Lanier
While advocates for dripless shaft seals typically touch on benefits such as no drips, no flax to replace, and no shaft scoring, the mic-drop zinger when comparing them to conventional stuffing boxes is always the same: “They’re maintenance-free!”
While it’s true that dripless shaft seals, such as PYI’s popular Packless Sealing System (PSS), require less care than a traditional packing gland, nothing on a boat is truly maintenance-free. Here’s how to maintain and troubleshoot these modern marvels.
A little background
There are two primary types of dripless shaft seals: lip seals and face seals.
Lip seal units employ a synthetic rubber sleeve encased within a metal housing. The seal is situated directly against the shaft to prevent water entry, and it remains stationary as the shaft rotates inside it; the ring does not rotate. A popular example of a lip seal gland is the Tides Marine Shaft Seal.
Face seal units form a mechanical seal and work on the principal that when two highly polished surfaces are properly mated, water can’t pass between them, even when one is spinning and the other is stationary. A good example is the PYI PSS shaft seal.
The static surface of the PSS seal is a high-density carbon-graphite flange held in contact with a stainless-steel rotor, which is attached to and turns with the shaft. The flange is attached to the shaft log (the tube where the shaft enters the hull) by a flexible nitrile rubber bellows. Water pressure and resistance of the bellows to compression maintains enough pressure to keep the faces of the flange and rotor in contact.
In addition to the rotor, flange, and bellows, the PSS unit also contains two nitrile O-rings (used to seal the rotor to the shaft), four stainless-steel set screws (to secure the rotor to the shaft), and four stainless-steel hose clamps used to attach the rubber bellows to the shaft log and carbon-graphite flange.
New units will also include a pre-installed hose barb in the graphite flange. On vessels that exceed 12 knots under power, this barb is plumbed to the engine raw-water exhaust system and is used to inject cooling water into the unit to prevent overheating. For slower displacement vessels (those below 12 knots under power with no bearing in the shaft log), the barb can be plumbed to provide cooling water or be used as a vent, which eliminates the need to “burp” the seal of air when launching after a haulout.
Routine maintenance
The rubber bellows must be inspected regularly for signs of cracks, wear, aging, and chemical deterioration. PYI recommends the rubber bellows be inspected twice annually and replaced every six years (regardless of condition) along with the O-rings, hose clamps, and set screws in the stainless-steel rotor. PYI offers a maintenance kit that contains all necessary replacement parts, along with an Allen key for installation.
Bellows located in the same space as non-sealed batteries may require more frequent replacement due to battery off-gassing while charging. Sulfuric acid vapors, as well as use of an air purifying machine (i.e., ozone generator), will accelerate deterioration of the rubber bellows.
Finally, you may notice a whitish deposit around the edges of the rotor and flange. This residue is salt crystals, the formation of which is a normal condition (in saltwater anyway). The salt won’t harm the unit and can be easily removed with a damp cloth.
Troubleshooting
The PSS seal should never leak at rest. While underway, it should never make noises or generate more than a fine spray or mist. Here’s a look at the various problem scenarios you could experience, along with their causes and how to correct them.
Pros and cons
While lip seal and face seal units are both viable choices when replacing your old stuffing box, each has pros and cons. Lip seal units are less expensive than face seal models and have a fair amount of tolerance to shaft misalignment and vibration. Installation-wise, they require a “pristine” shaft for a proper seal. Shafts that are not completely free of corrosion, nicks, pitting, and so on, may be difficult (if not impossible) to retrofit with a lip seal unit.
Face seal units are a bit more expensive and have moving parts. However, they can be mounted to older or less-than-perfect shafts and still provide a good seal.
In this article we’re discussing maintenance and troubleshooting tips for the popular face seal alternative PYI PSS shaft seal. A similar look at lip seal units will the topic of a future article. — F.L.
Photo: Frank Lanier
Scenario 1
Your boat is docked and the engine is not running, however, while checking the engine compartment, you notice water leaking from the shaft seal.
First, inspect the seal to determine where the leak originates. If leaks are found where the bellows attaches to the shaft log or carbon graphite flange, check the hose clamps for looseness or damage. If there’s leaking around the nylon hose barb, check that the hose clamps (and barb itself) are snug and properly tightened.
The most common cause of minor leaking is the presence of foreign material between the stainless-steel rotor and the carbon flange. Even a single grain of sand or a blade of grass can break the seal, resulting in drips and leaks.
To clean the mating surfaces of the rotor and flange without disassembly, simply compress the bellows while forcing them apart, allowing the incoming water to flush out the debris. You can also wipe both mating surfaces with a clean cloth while flushing – just be quick about it as water will be gushing into the boat while the bellows is compressed.
Scenario 2
While your boat is still tied to the dock, you’ve cleaned and flushed the two surfaces to remove any debris. However, water is still leaking between the rotor and graphite flange.
Start by checking the bellows for proper tension. Even when installed correctly, the bellows can lose tension over time due to slippage at the shaft log, particularly if the shaft log is smooth and lacks a stop or area for the end of the bellows to butt up against. Conversely, it could be the rotor moving up the shaft (due to excessive vibration) causing the bellows to lose tension.
After determining whether the problem is with the bellows or the rotor movement, loosen the rotor and recompress the bellows per the installation instructions. While adjusting the bellows, remember that the numbers given in the bellows compression chart are average figures and provided as a guide only. The exact compression amount required to provide a good seal can vary due to number of reasons, from differences in engine mounts to variations in cooling water pressure provided to the seal.
As such, you may need to add an additional quarter-inch of compression to attain proper compression. As a final belt-and-suspenders approach, installing a collar zinc inboard of the rotor provides an additional layer of insurance to keep the rotor in place, particularly if movement due to excessive vibration is a concern.
Tip
Photo: Frank Lanier
Scenario 3
While underway and operating at cruising rpm, you check the engine compartment and notice a fine black mist emanating from the shaft seal.
Sweat starts beading on your forehead, but before the hackles on the back of your neck can fully rise, you remember the break-in period mentioned in the installation instructions. The carbon flange is polishing the stainless-steel rotor, a process that generates a fine mist that’s often accompanied by black dust. This is a normal occurrence and should stop after the first hour or so of operation. If it continues past the break-in period, however, you’ll want to determine why.
One possibility is incorrect tension of the bellows, which can be corrected as discussed above. Another possibility is foreign material on the seal faces. Although most contaminants can be flushed or wiped clean, some may require more aggressive removal methods. In this case, you can polish the seal using a folded piece of 600-grit wet/dry sandpaper. You can do this while in the water by compressing the bellows slightly, placing the sandpaper between the faces, releasing the bellows and making eight to 10 sweeps around the inside of the carbon flange.
If hauled, you can take this a step further by polishing the mating surfaces with toothpaste. (One that contains baking soda works best.) Loosen and slide the rotor forward on the shaft; apply a thin, even coat of toothpaste to the carbon flange; then press the rotor against the flange while turning to polish both surfaces. Wipe both surfaces with a clean, soft cloth and acetone prior to reassembly.
Scenario 4
The seal is drip-free at the dock but sprays water while the boat is underway.
Contamination of the seal faces with oil or grease is the likely cause. While reading the PSS instructions (something you should do whether you installed the unit personally or not), you’ll notice cautions against using silicone or petroleum-based products when installing the seal. A single drop of oil or a speck of grease on the seal mating surfaces can result in water spraying from the seal while underway. Cleaning the seal as described in Scenario 3 should correct the problem. Keeping other fluids (e.g., antifreeze) away from the seal will also help prevent contamination problems.

Photo: Frank Lanier
Scenario 5
While cruising toward your favorite anchorage, you suddenly hear a high-pitched squeal coming from the seal.
Immediately reduce speed and, if possible (and safe), come to a complete stop and shut down the engine. Sudden squealing generally occurs in powerboat installations due to overheating caused by a lack of cooling water. A dry-running seal can get extremely hot, so avoid touching the unit to verify overheating. Instead, check for the smell of burning rubber, use a noncontact thermometer, or simply inspect the unit once cooled.
If this is a new installation and your vessel is faster than 12 knots or so while under power, check that the cooling water was plumbed to the seal via the nylon hose barb fitting. If not, once you exceed 12 knots, a vacuum can form at the stern tube, drawing cooling water away from the seal and causing it to overheat.
If the seal is plumbed correctly, check the hose for kinks or damage. The steps for this inspection will depend on how the unit is plumbed (i.e., into the engine raw-water cooling system or an underwater thru-hull). But it may involve pulling the hose at the nylon barb to verify the presence of cooling water.
It’s not unheard of for the hose or nylon fitting itself to become clogged with debris or even ice in colder climes, one reason I recommend blowing out the hose (or simply replacing it) annually as part of your normal preventive maintenance schedule.
Slower-moving displacement vessels can also experience overheating, particularly with an older PSS installed. All new units come with the hose barb mentioned above installed, which (for slower vessels) can either be plumbed to provide cooling water to the unit or as a vent tube for the bellows as mentioned previously. Older units may have the hose barb removed and replaced with a plug. This installation requires you to “burp” the unit of air by decompressing the bellows each time the vessel is launched, allowing water to enter the bellows. Failure to remove this air pocket can prevent cooling water from reaching the seal, causing it to overheat.
In any boat, if you have no cooling water pumped to the dripless seal by the engine or by other means, it’s wise to check the heat of your seal. It’s reported that some boats with no engine running and under exceptionally fast tow or, as sailboats, surfing down huge, steep waves in large storms, have had dripless seals overheat, sometimes resulting in seizing, which damages the bellows or hose to the shaft log. Many consider that running the engine slowly or stopping the shaft turning (if safe) is a sensible thing to do in these unusual circumstances.
Any time overheating occurs, check the seal thoroughly and replace any damaged components prior to placing the vessel back into full service.
If in doubt about the condition of a component after overheating (or any potentially damaging event), my advice is to simply replace it.