Advertisement
Before you drive yourself crazy sourcing a plastic replacement part for your boat, you might be able to easily fix it yourself.
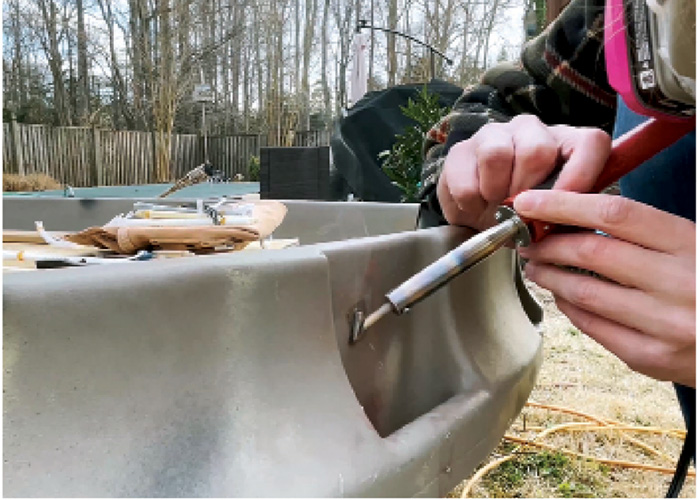
Photo: Ryan Gullang
Much like fiberglass, plastic can be repaired with some know-how and the right set of tools. And if you’re cruising off the grid, these tools and familiarity with them can be indispensable. Here’s how to do it.
Why weld plastics?
Earlier this year, I bought an 8-foot polyethylene jon boat for $50. A brand new one is about $1,200. Lucky for me, the previous owner had affixed a duck blind to it. So now, all that was keeping water out were a couple dozen rusty drywall screws. I say “lucky” because that turned out to be an easy and inexpensive fix.
Plastic welding is commonly used to repair car bumpers and patch kayaks. The method yields better results than chemical sealants or adhesives because it involves patching rather than filling openings. Due to the properties of plastics, they are durable, flexible, and repel water. Excessive force, heat, radiation, and certain chemical agents can break down these bonds and make the material more susceptible to cracking, warping, and leaking.
Welding plastic rebuilds molecular bonds and helps retain the material’s original properties and function. The process involves softening and reforming the bonds within the material through the controlled application of heat. Once the existing plastic is heated, a filament (or welding rod) is worked into it so that new bonds form across the welded area as it cools.
There is some nuance to repairing plastic, but it’s easy to get started. Fixing my holey jon boat cost me $30 and a couple afternoons of trial and error. I’ll be the first to admit that my welds aren’t necessarily aesthetically pleasing, but, after seven months of hard use, my boat is still leak-free.
Safety First
Plastic welding should only be performed in a well-ventilated area with proper safety equipment. Airborne plastic fumes and particulates can pose a serious health risk if they end up in your eyes or respiratory system. Whenever plastic is being heated, sanded, or cut, you should be wearing sealed protective eyewear and a respirator with cartridges specifically rated for plastic fumes (I use 3M 60926 Multi-Gas P100 cartridges). When working in hard-to-reach places, you should add heat-resistant gloves and long sleeves, but it’s best to avoid synthetic fabrics as these can melt. Leather is best. Always consult the manufacturer’s instructions before plugging in your welding tool, especially as they pertain to extension cords. — R.G.

Photo: Ryan Gullang
Choosing a welding tool
The tool I use in this article is a JounJip airless welder that I bought through Amazon as part of a bumper repair kit. There are a few different types of plastic welding tools, but airless welders and hot air welders are best suited for noncommercial applications. Airless welders are a common and affordable option (often marketed as automotive bumper repair kits). They’re essentially soldering irons that contact the welding rod and the welding surface.
Hot air welders are usually more expensive and function similarly to a heat gun. They work by blowing hot air on the welding surfaces and tend to lend better results, especially for larger cracks. Some products blur the line between these two categories, but work in much the same way. Features to look for are temperature controls and over temp/current protection.
Identifying plastics
There are a bewildering variety of plastics out there, but for welding, the most important distinction is between thermosets and thermoplastics. Thermosets can’t be welded because once they’re cured, they will retain their shape even when exposed to heat. On the other hand, thermoplastics will melt, bend, and warp when heated and are therefore weldable (with a few exceptions).
There are a couple of ways to determine if a plastic is thermoset or thermoplastic. One way is to look for manufacturer or recycling markings (which we’ll discuss in greater depth later). Another option is to apply heat with a welding tool to an inconspicuous part of the component – about 500 F should do. If you don’t have a welding tool yet, you can heat up the tip of a screwdriver (or any piece of metal) with a lighter for about 30 seconds and follow the same procedure. If the plastic doesn’t melt, it’s probably a thermoset.
The welding rod usually needs to be the same type of plastic as the part being welded. Additionally, every type of plastic needs to be heated at a different temperature. Manufacturers will often stamp the name of the material being used alongside the three-arrow recycling symbol. If there’s a number from one through seven printed inside the symbol, consult the Resin Identification Code, or RIC, online to figure out what you’re working with.
In lieu of any markings, you can pick up a plastic welding rod test kit from your local hobby store, hardware store, or online retailer. These will usually consist of a few dozen welding rods, each marked with the plastic they’re made from. (The testing process is described below.) Even if you’ve ascertained the type of plastic through other means, it’s still a good idea to test it to make sure.
The nuclear option is to cut off a thin length of plastic from the part being welded to use in place of a welding rod. The advantage of this technique is that you don’t have to worry about matching the material or color. However, if you don’t know what type of plastic you’re working with, you’ll have to use trial and error to determine its weldability and ideal welding temperature.
Photos: Ryan Gullang
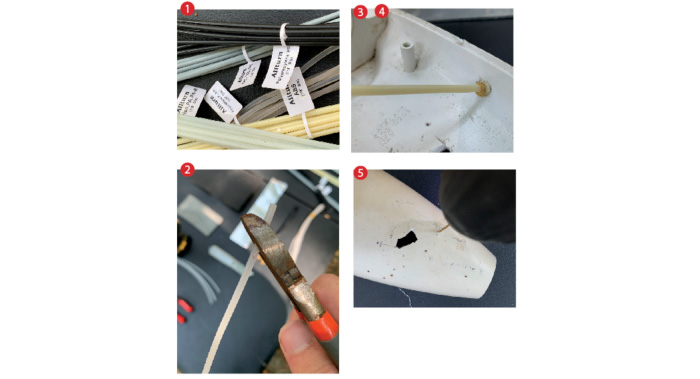
Using a welding rod test kit
1. Find an area about the size of a quarter that you don’t mind looking a little rough. Using a wire brush or courser-grit sandpaper, scuff the area and remove any paint, dirt, or other contaminants.
2. Select a welding rod from the test kit and make a note of the material it’s labeled as. Then cut the tip of the rod at a roughly 45-degree angle.
3. With your welding tool, heat the prepped area until glossy. Then, heat the tip of the welding rod and press it onto the test area. Welders with temperature control should be set to the recommended temperature for the type of welding rod.
4. Once the weld has cooled completely, try to remove the welding rod. If it breaks at the weld, return to Step 2 and repeat the process with a different rod. The plastics are a match if the weld holds or the rod snaps in the middle. If that’s the case, snip off the excess and clean up the area as you see fit.
Photos: Ryan Gullang
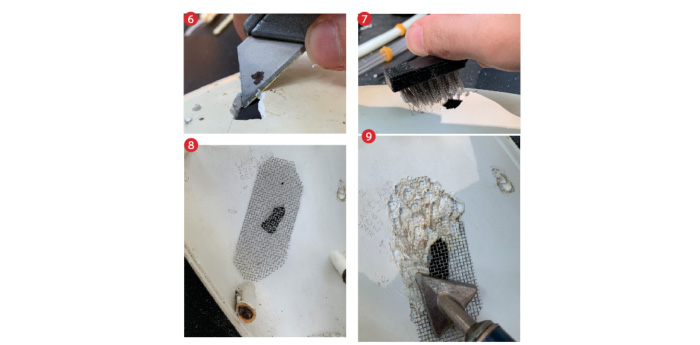
Sand and prep
5. Prep the area before welding. If you’re trying to repair a cracked surface, drill holes in either corner of the crack with a small drill bit. This will stop the crack from spreading.
6. If you’re repairing a crack or fixing a part that’s broken in half, use a sanding cone to create a V-shaped groove along the inside edges of the opening. This will give the new plastic a larger area on which to pool. If you’re filling in a screw hole, create a slope around the rim of the opening (as you would when countersinking a screw) using either a counter sinking bit, sanding cone, or utility knife.
7. Using either course sandpaper or a wire brush, remove any paint, plastic shavings, or other debris from the welding area. Also, rough up the area as much as possible to give the new plastic something to hold onto. Any persistent debris may require chemical solvents. These should be fully removed before you start welding. If using a wire mesh for extra reinforcement, repeat step three on the opposite side of the welding surface.
8. Cut a piece of wire mesh large enough to cover the opening with at least a half=inch of extra space on all sides. Fit the mesh to the opposite side of the welding surface for added reinforcement. It’s not necessary if the reverse surface is not accessible or for repairing screw holes. If the rear isn’t accessible, you can try affixing the mesh to the front of the welding surface as long as you’re not worried about aesthetics.
9. Heat the welding tool to the appropriate temperature for the material, and attach the mesh using tack welds. Using the head of the welder (hot air welders usually come with a tack-welding attachment) press the mesh into the plastic. It should take about the same amount of force as opening a soda can tab. Once the mesh is partially submerged in the plastic, remove the plastic welder and allow the weld to cool. Repeat on alternating corners. Take your time. If the plastic is still warm when you make the next tack weld, the corners of the mesh can peel up. Work your way around the mesh until the edges are barely visible beneath the plastic.
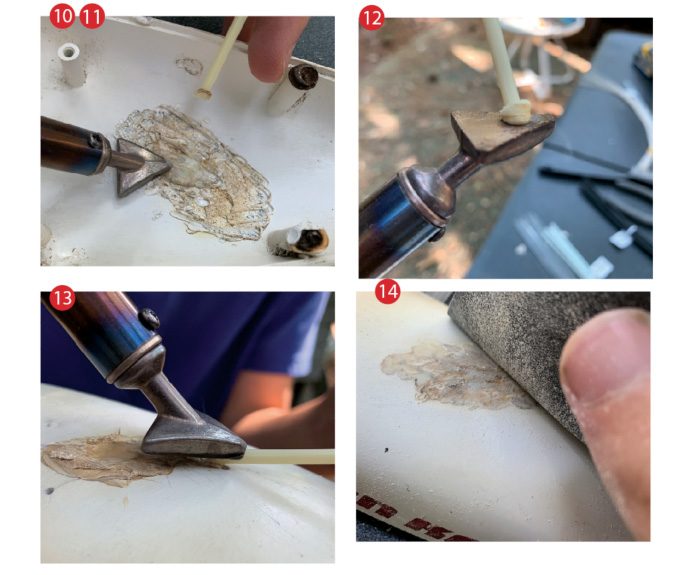
10. For added rigidity, work plastic into the open area of the mesh (on the side facing away from the opening) using a welding rod. Bond the plastic using a speed or pendulum weld (see below sections that apply to your style of welder). Heat the mesh-infused edge of the opening to start the weld. Move the welding rod toward the center to create a backing for the weld. Go slowly, allowing the welds to cool. Heat the mesh carefully so as not to let it peel up. When you’re done, the opposite side of the welding area should be completely covered in plastic.
Photos: Ryan Gullang
Welding
11. If possible, set the welder to the appropriate temperature for the material you’re working with. Start by heating up the edges of the opening until they become soft and glossy. Apply roughly the same amount of pressure as you would if you were flossing your teeth. All the plastic within half an inch of the opening should be melted. For welders without a temperature dial, you’ll have to regulate the temperature of the plastic based on how long you apply heat – this takes some trial and error. The darker spots on my weld are due to overheating. If you get any dark buildup on the tip, you can remove it with the wire brush.
12. Dollop weld With cheaper contact welders or when filling holes, you may have to employ what I have coined the “dollop weld.” Place the tip of the welding rod directly on the tip of the welder head. Apply consistent pressure so that, as the rod melts, the plastic forms a ball. Avoid heating the plastic for so long that it starts to turn brown or yellow. Once you’ve got a good-sized ball, press it against the edge of the opening and smear it into the hole or crack. The new plastic should cascade from on top of the old plastic and into the opening.
13. Speed weld Where applicable, this type of weld is preferable. Start by holding the welding rod in line with the crack. Tack the end of the rod to the edge of the crack, applying pressure to get the melted plastic to bead up slightly. Then press the rod down into the crack by slowly running the welding tool over the top of it. Once you reach the opposite edge of the crack, hold the tool against the rod until the excess pulls away.

Photos: Ryan Gullang
Finishing touches
14. When the weld is finished, chances are it will look a little rough. If there’s a lot of excess material, remove it using a utility knife, but try to leave a layer of plastic along the edges to keep the new plastic in place. For a finer finish, you can use finer grit sandpaper.
15. Once the surface is smoothed out enough, a quick blast with a heat gun will get rid of any scratches left behind by the sandpaper. Unfortunately, paint is likely to flake off most hydrophobic plastics unless they’re fire-treated (which involves a blow torch). If an area is particularly rough, you can try reheating the weld – or just smack a BoatU.S. sticker over it.
16. Carefully test your repair to ascertain that the strength of your weld is sufficient to meet the uses for which it is intended.