Advertisement
A leak around deck hardware is not only annoying, it is probably damaging your boat. With today's effective sealants, making deck hardware watertight is not all that difficult, and if you bed your boat's hardware properly, you will only need to do it once.
Gather Necessary Materials
You will need a tube or a cartridge of the appropriate sealant. (You will find advice on selecting the right sealant in another Don Casey Library How To.) If you purchase a cartridge — economical when you have quite a bit of rebedding to do — you will need a caulking gun. A scraper helps in removing old sealant. You will need a roll of masking tape — the blue "Long Mask" variety which allows you to leave the tape in place until the sealant has cured fully. Add a few rags and a quart of acetone and you're all set.
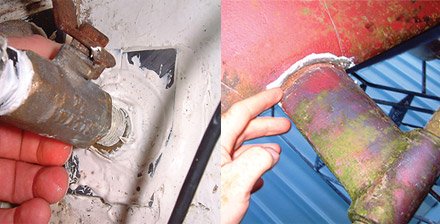
Remove the Fitting
Removal is often the hardest part of the job, either because access to the fasteners is difficult to gain or because the bolts are frozen — or both. Access sometimes requires removing cabinetry or inner liners, but you cannot avoid this by simply running a bead of sealant around the fitting. Do that and eventually you will still be removing the fitting, only this time in preparation for major deck repair.
Bungs — wooden plugs — typically hide the heads of fasteners securing wooden components. If the wood is tight-grained and unvarnished, the bung can be extracted by drilling a small hole in its center and threading in a screw. When the point of the screw finds the screw head below the bung, continuing to turn the screwdriver lifts the bung. Don't attempt this method on varnished wood without sanding the area to raw wood first. Even when the wood is raw, extracting bungs this way can splinter the edge of the bung hole in some types of wood. The alternative is to drill the bung with a bit slightly smaller than the diameter of the bung, then carefully remove the remaining ring of material with a narrow chisel.
Extracting the fasteners will not release fittings installed with polyurethane. Attempts to pry bonded fittings loose are likely to result in damage to the deck and the fitting. Fortunately there is a solvent available — Anti-Bond 2015 — that can help to release the grip of polyurethane. If you cannot coax a stuck fitting free with a heavy hammer and a block of wood, assume the bedding is polyurethane and go back to the store for Anti-Bond. If you employ heat to release a fitting, be sure the fiberglass never gets too hot to touch.
Clean Both Surfaces
If you fail to remove every trace of the old sealant, the new sealant will adhere to it rather than to the deck and fitting. That makes the new seal the same as the old one and your entire effort wasted. Use a blade, sandpaper, or a wire brush as required to get both surfaces squeaky clean. Remove all residue from both the deck and the fitting with acetone.
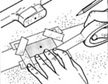
Mask
Cleaning up the sealant squeeze-out with solvent takes twice as long as masking and is 10 times messier. Tape the deck around the perimeter of the fitting. For curved sides or rounded corners, apply the tape under the edge of the fitting, then trim it by tracing around the fitting with a razor knife. Peel up the tape under the fitting. Also mask the edge of the fitting.
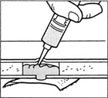
Coat Both Surfaces
With the tip of the tube or cartridge cut at a 45° angle, apply the sealant with a forward motion, pushing the bead in front of the nozzle. Coat both surfaces and use a putty knife to spread the sealant evenly, like buttering bread. Apply a ring of sealant just below the head of each mounting bolt before inserting, but skip this step if the fitting is attached with screws. NEVER seal the fasteners on the underside of the deck; if the seal with the outer skin breaks, you want the water to pass into the cabin where it will be noticed.
Snug But Don't Tighten
Assemble the parts and "snug" the fasteners enough to squeeze sealant out all the way around. The most common bedding error is fully tightening the fasteners while the sealant is soft. This squeezes out all of the sealant, leaving a dry joint that will soon leak.
Wait
Allow the sealant to partially cure — 30 minutes for silicone, 24 hours for polysulfide or polyurethane — then fully tighten the bolts by turning the nuts only, to prevent breaking the seal around the shank of the bolt. If the fitting is attached with screws, withdraw them one at a time and ring each with sealant. Reinstall the screws and drive them home evenly. Tightening fasteners after the sealant cures puts it under compression, greatly extending the life of the seal.
Trim
Let the sealant reach full cure — 24 hours for silicone, a week for the polys — then trim away the squeeze-out by running a razor blade around the fitting and peeling away the masking tape. Properly trimmed bedding shows only the thinnest edge beneath the fitting. Never leave a fillet around the edge; silicone attracts dirt, polyurethane yellows, and polysulfide weakens in the sun.
Special Precautions for Cored Construction
Most decked boats are constructed with a wooden core in the deck to stiffen it. Smaller powerboats use a similar construction technique for the transom. If water is allowed to penetrate, rot in the core is the usual consequence. Repairing saturated or rotten core is a very big job, the cost often exceeding the value of the boat. More boats "die" from core problems than from any other single cause.
Water would never reach the wood core if we didn't drill holes in the deck (and transom) to mount hardware items. But we do, and as good as marine sealants are, it is a high-stakes gamble to depend on them to keep water out of the core. Anytime you bore or cut a hole in the deck, seal the exposed core with epoxy before mounting any hardware. If you are rebedding old hardware, be certain that the core has been properly sealed, or follow this procedure before reinstalling the fitting.
1. Drill all fastener holes oversize. It isn't necessary to oversize cutouts.
2. Remove all core within 1/4" of the hole or cutout. A bent nail chucked into a power drill is an efficient tool for chipping out the core. Vacuum the pulverized core material from the cavity. Whatever you can't remove will act as a filler.
3. Saturate the exposed core with epoxy. On horizontal surfaces, seal the bottom of the hole with duct tape and pour catalyzed epoxy into the top. When the cavity is full, allow a minute or two for the unthickened epoxy to saturate the core, then puncture the tape and let the epoxy run out back into your glue container. For vertical surfaces you will have to inject the epoxy into fastener holes. Use a brush to "paint" the core around cutouts.
4. Mix colloidal silica into the epoxy (the same epoxy you have already poured through the holes) to thicken it to a mayonnaise consistency — stiffer for holes in vertical surfaces. Retape the bottoms and fill each cavity level with the deck.
5. Allow the filler to cure fully, then redrill the mounting holes through the cured epoxy. Sand and clean the area that will be under the fitting and you are ready to bed the hardware as detailed above.