Advertisement
Refinishing your boat's interior bulkheads isn't a difficult job, the professionals who detail boats know a few tricks for achieving a quality finish.

Brightly finished interior bulkheads do not require the routine maintenance of exterior brightwork that's subject to weathering from the sun's rays, salt, and other climate hazards. But with time, the gloss fades, surfaces become stained and it's time to renew the finish.
Teak is the wood of choice for interior bulkheads and originally it likely had either a saturating oil or varnish finish. First determine the coating type used. Oiled wood appears dull and dry, especially if it hasn't been recoated for a long time. Restoring an oil finish requires less effort in surface preparation and application, assuming the wood is in good condition. Simply clean, lightly scuff the surface and you're ready to coat.
Varnished wood typically retains its gloss, regardless of age, when not exposed to UV light. Mildewed or stained oiled or varnished surfaces require additional pretreating before refinishing.
Surface Preparation
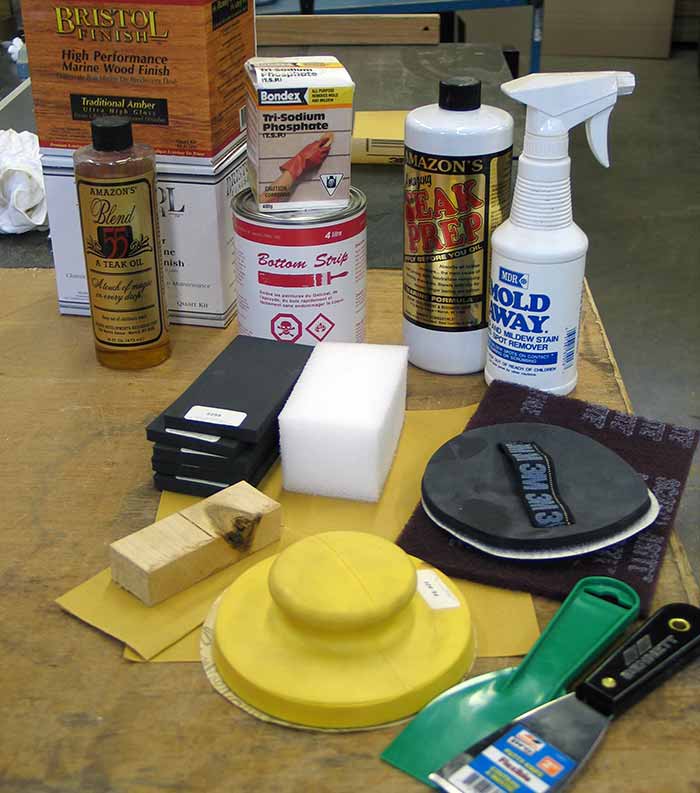
To treat surface mildew, clean with a mildew stain remover or use a solution of hydrogen peroxide, boat soap and water. To remove water stains or for spot bleaching, use a teak cleaner. Wipe down the bulkhead with one part MDR Amazon Teak Cleaner poured on a sponge. For more stubborn stains, my favorite is Cape Ann One-Step Teak Cleaner. Because it's a thick gel, it stays on the stained area. Apply with a brush and in a few minutes simply wipe or rinse off with clean rags or paper towels. If the surface is in good condition, clean and degrease with a solution of trisodium phosphate (TSP), sold at hardware and paint stores, applied with a sponge. Mildew or water that migrates under the coating causes the surface to turn a milky color and the varnish to lift. If the finish is salvageable, then clean with TSP.
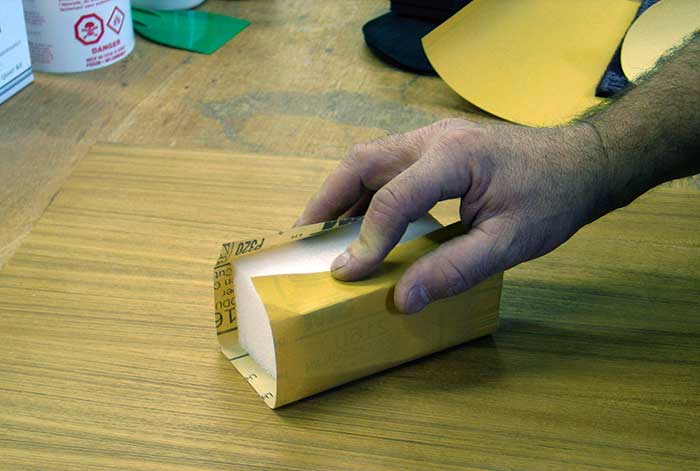
Follow any cleaning with a very light sanding. This is not the occasion for aggressive power sanding or you risk breaking through the plywood's face (a veneer), actually not much thicker than a few sheets of paper. If you sand through the face veneer, you'll reveal a different color wood running in a perpendicular direction. Using a power sander can also create deep scallop-shaped indentations or leave swirl marks that become noticeable after applying a glossy finish. Use a rigid sanding block held level against flat surfaces and a soft pad for round or contour areas. Select the finest grit sandpaper that effectively removes the old finish; usually, 240- to 320-grit paper. Never "hand" sand but always sand with a rigid block. Its flat profile evenly distributes the pressure and reduces the risk of sanding through the veneer.
Rather than using sandpaper, some detailers use a 3M Scotch-Brite General Purpose Pad or ultra-fine maroon pad to gently scuff the surface in preparation for coating, as well as for sanding between coats. The goal here is to lightly scuff the surface to create a rough pattern that grabs the oil or varnish.
Removing a peeling varnish finish may require a chemical stripper applied with a brush. An effective stripper wrinkles the finish and then it's scraped off using a plastic blade or modified steel scraper. Apply light pressure so you don't scrape through the wood. If you prefer to use a coarse pad, select a bronze or synthetic one. Never use steel wool — it can leave tiny steel fragments that create rust stains. Sanding is often more effective than a chemical stripper, depending on the condition of the varnish. Chemical removal is the only means for removing a recent oil finish.
After sanding or stripping, you may want to apply a teak brightener (part "B" of a two-part teak cleaner) to bring back the color. Where teak is mildly discolored or has turned a grayish color, a light sanding with 320-grit paper may restore the wood’s natural color.
Should you decide to switch from oil to varnish, your success depends on the time span since the last oil recoating. For bulkheads that haven't been recoated in a long time, there's likely little oil left. Simply wipe down with a solvent (acetone, lacquer thinner or the recommended varnish thinner) and then lightly scuff with the maroon pad and you're ready to varnish. Do a spot test first to be sure no contaminants remain that might lift the varnish, or consider using a clear finish, such as Bristol Finish, MDR Amazon Teak Luster or others, that claim to overcoat oiled surfaces without additional surface preparation.
Remove all dust by vacuuming the bulkheads and the entire interior and then rub down the bulkheads with a tack cloth. Allow at least an hour for the dust to settle before applying the finish.
Always protect your eyes with goggles, especially when sanding. Make sure you have sufficient ventilation and use a dust mask and a respirator with carbon filter when applying any coating.
Clear Finishing
Oil selection depends on the desired color and finish. Some products change the wood color, or the texture of the wood. Oils come in three finishes: matte, satin or gloss. They soak into the wood without any surface buildup, resulting in a natural wood-like finish after the necessary six or more coats. Varnish builds up faster with fewer coats and requires a light scuffing between coats.
Before coating, the wood must be dry. Mask the edges using a fine striping tape; it's a timesaver when applying multiple coats as it eliminates the need for exactness. Apply oil with a foam brush then wipe down with a rag. Some pros prefer "ragging" oil by pouring a small amount on a cotton rag (old T-shirts or diapers work great) and then rubbing the oil into the wood, always working with the grain. Apply just enough oil so it soaks into the wood. Never apply so thick that oil floats on the surface. After a light rubbing, a visible oil slick confirms there's enough oil. Let dry for a day and then reapply. Apply three coats and then lightly scuff the surface with the maroon pad. Some users prefer to sand with 280- to 320-grit paper wrapped around a block. No matter how you sand, do it lightly. A minimum of six coats provides the necessary protection for most oils but check the label for coverage instructions.
Varnish types are either single or two-part, which requires a catalyst. Two-part varnishes are more difficult to apply but are longer lasting, more durable, and offer higher gloss retention and better scratch resistance than one-part varnishes. A conventional varnish requires eight to 12 coats to obtain the same deep luster accomplished with three to four coats of a two-part varnish. However, the high toxicity of two-part coatings may make it unsuitable for use in confined interiors without the proper respiratory equipment. (For a detailed story on varnishing, refer to DIY 2005-#4 issue.) Recoating a one-part with a two-part varnish can lift a new finish but may not pose a problem with an aged finish after a thorough cleaning and sanding. Best to do a test patch first. Apply one coat per day, lightly scuffing the surface with the maroon pad between coats. Only before the final coat should you dry sand with 320-grit paper wrapped around a foam block.
There is nothing quite as satisfying as cabin woodwork that looks professionally refinished and it is easily within reach of the do-it-yourselfer.