Advertisement
Get back to basics by learning how to navigate using a few simple tools and some common sense.
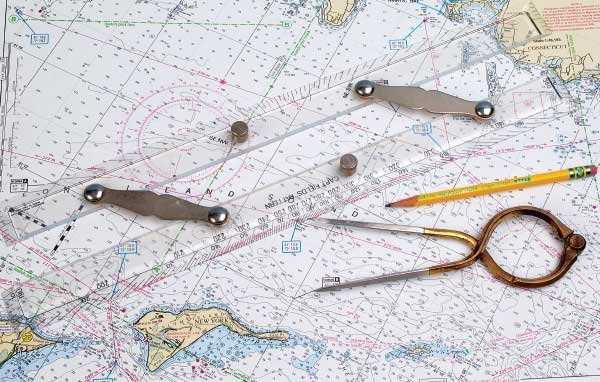
Imagine for a moment (or perhaps remember) a time without chartplotters. Could you navigate safely without them? Should the electrons stop flowing, you'll be glad to have four navigation tools aboard, plus the basic know-how to use them: backup paper charts, a compass, parallel rulers, and a set of dividers.
Tip
Use a soft pencil when drawing on a chart, never pen. Erase marks at the end of a passage so the chart is ready for next time.
Granted, it's a little hard to justify $50 or $100 for a chart book when you can buy a $10 app with every chart of the coast. Still, there's no substitute for a set of accurate paper charts for the waters you're in. If you're not familiar with standard chart symbols, download and print a free copy of "U.S. Chart No. 1" from the National Oceanic and Atmospheric Administration (NOAA). You'll find the meaning of every chart symbol there. You can also download other free charts from NOAA (see below), but normally it's difficult to perform the kind of work we're discussing on a printout of these downloads.
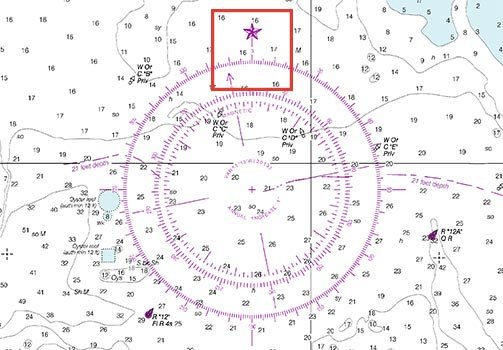
Figure 1. The 0 in the outer circle of the compass rose points to true north — that is, the North Pole. The inner circle points to magnetic north. Depending on your position, the variation between those figures may range from 0 to 20 degrees or more.
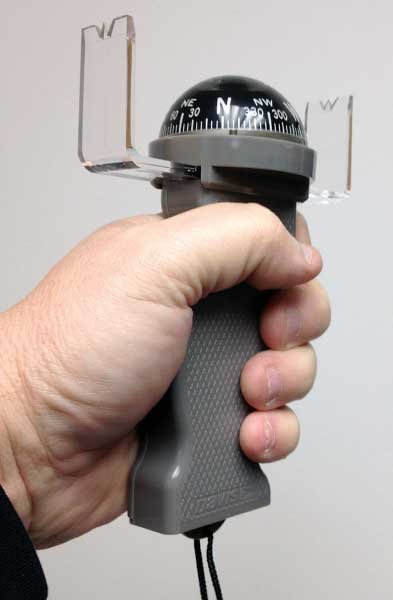
A good hand-bearing compass is rugged and easy to read in any condition of light.
On the chart, you'll need to measure two things: direction and distance. The chart's compass rose (see Figure 1) is the key to measuring direction. Notice that it has two circles, each broken into 360 degrees. In the outer circle, a line drawn through 000 degrees and 180 degrees is parallel to the chart's longitude lines (the lines running north and south); a line drawn through 270 degrees and 090 degrees on this example chart is parallel to the latitude lines (the lines running east and west). By convention, directions are expressed as three-digit numbers; 000 degrees points toward the geographic north pole.
But notice that inner circle on the compass rose — especially the fact that 000 is offset. Why? Because there's a difference between true north and magnetic north. And because your compass points to magnetic north, that inner circle is the one you'll use for piloting. To clarify in writing, we use a "T" for true and an "M" for magnetic. According to the compass rose in Figure 1, 000M is equal to 349T. Note that most electronic chartplotters are set to navigate using magnetic north, so their courses will be corrected for this difference.
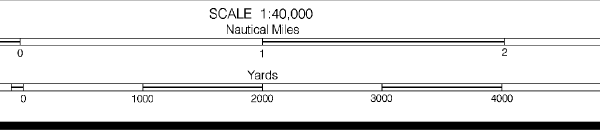
Figure 2a.
Figure 2b.
Most charts provide a scale to measure nautical miles (See Figure 2a). You can also use the latitude scale along the right and left sides of the chart — but never the longitude lines, because the longitude lines aren't parallel; they diverge from each other at the equator and converge at the poles. By contrast, latitude lines are not only parallel but are also directly related to distance. Everywhere in the world, one degree of latitude equals 60 nautical miles, and one minute of latitude equals one nautical mile (See Figure 2b). You can use a pair of dividers to either measure a distance on the scale and walk it down your track or measure the length of your track and gauge it against the distance scale.
Having mastered charted distances, we need a tool to compare the directions of features we see around us with symbols on the chart. Your boat is probably fitted with a compass that's been magnetically adjusted. If so, it should be mounted in a place near the helm that lets you see it clearly as you're steering. But is its position in the boat ideal for piloting? If you can sight across the compass card and see the unobstructed horizon in every direction, then it is. If it isn't, carry a good hand-bearing compass aboard; they're available for between $50 and $130. If you have the chance to try several at a chandlery, look through them as you turn your body, then stop short. Does the compass card (the piece inside the compass that rotates to keep the arrow pointing north) settle quickly or does it keep spinning? Are the courses clearly legible? Is it rugged? How does it feel in your hand? For twilight situations, a lighted compass card will prove valuable. A good pair of marine binoculars with onboard compass is also helpful, and many of these have backlighting.
So far, the compass rose shows directions on the chart, and our onboard compass shows us the directions of features around us. How do we relate the two? For that, you'll need parallel rules. Parallel rules and dividers are shown in the main photo. Line them up through the center of the compass rose and run through 030M and 210M. Hold one rule firmly as you extend the other outward. Now, hold the second firmly while you extend the first one outward. As long as you keep one rule firm while you move the other, the line along the rules will always represent the direction 030M/210M.
Tip
To find distance on a chart, you can either use a scale of miles or the latitude lines. Remember that one minute of latitude always equals one nautical mile. Standard units are tenths of a nautical mile.
With these four tools, you have what you need to navigate without your nav electronics. Now let's look at some tips and techniques.
Advertisement
The Techniques
Our first technique is to find out where we are. For our example, let's say we've just entered the Choptank River, off Chesapeake Bay, en route to Oxford on the Tred Avon (See Figure 3). The most prominent feature we see is a tower at the end of Blackwalnut Point. Sighting with the compass, we see that the tower bears 280 degrees. Using the inner circle of the compass rose on the chart, line up your parallel rules through the center hash marks and the 280. Next, walk the tool across the chart, always keeping one side firmly planted, till an edge crosses through the tower symbol at Blackwalnut Point. With a pencil, draw a light line through the symbol and long enough to cross your estimated position. Above the line, write the time the sight was taken, in four digits, using the 24-hour system; for instance, 1410. Below the line write "280C"; the "C" reminds us that the bearing came from our compass, which is subject to magnetic-field deviation from both the earth and the boat.
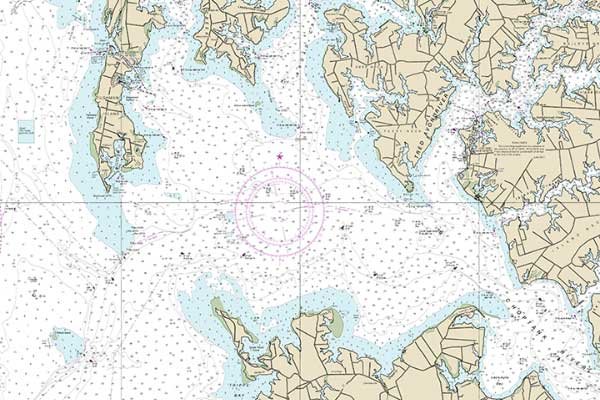
Figure 3. The mouth of the Choptank River, off Chesapeake Bay, is our starting point for position and setting our course.
Now do the same for the No. 1 beacon off Upper Bar Neck Point and for the last bit of land at Nelson Point. Your position is inside the triangle where the three lines cross. A dot with a circle around it and the time marks this position fix (See Figure 4).

Figure 4. When you take three bearings on known landmarks, the small triangle or point where they cross is your position fix. Mark each bearing with the time (above the line) and compass bearing (below the line). A circled dot indicates a positive fix.
From that known position, we can now plot a course toward Oxford, our destination. Benoni Point, at the Tred Avon mouth, is shoal, so let's plot a course outside the 35-foot Choptank River light. Align the parallel rules from our 1410 fix to a spot just off the light. Draw the line lightly in pencil. Next, walk the parallel rules through the center of the nearest compass rose. Make sure to read the numbers on the inner circle and in the direction you'll be traveling. Above your line on the chart, write "C 110M." The "C" reminds us that this is our boat's course, not a bearing we used to find our position.
Our last task is twofold: to measure the distance, and to reckon our estimated time of arrival at the light. The standard distance unit is nautical miles to the tenth; a nautical mile is 1.15 times as long as a statute mile. There are two ways to measure the distance, depending on whether the course leg is longer or shorter than the chart's scale. If it's shorter, measure the whole line with your dividers, then bring the dividers to the scale. At one end of the scale, you should find tenths of miles. By contrast, if your course is longer than the scale, open your dividers to a fixed distance on the scale (one mile, five miles; whatever makes sense under the circumstances). Now bring the dividers back to your course line, then walk them off, counting the spans. You'll probably have some course line left over at the end; close your dividers to that remainder, then measure that remainder with the tenths scale. Once you've measured the distance, write it below the line: "D 5.4 nm" (See Figure 5).
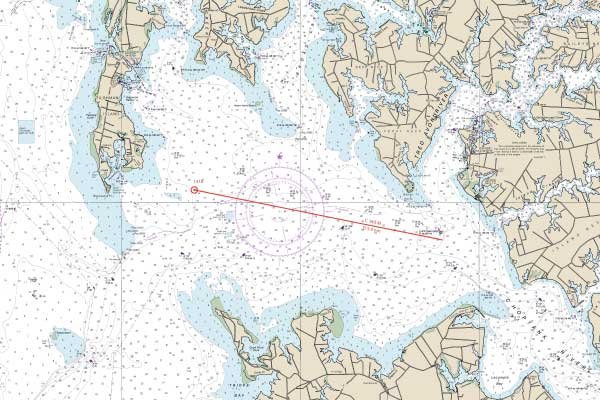
Figure 5. With your parallel rules, draw a line from your position to your next waypoint; walk the rules through the compass rose inner circle to find the magnetic course. Write it above the line. Next, measure the distance; write that below the line.
Finally, we'd like to know when we can expect to arrive at Choptank Light. We do that by using time-speed-distance calculations. Notice that there's an arithmetic expression in our conventional unit of speed: "miles" "per" "hour." Using nautical miles, as we are in this example, speed is expressed in "knots"; one knot is 1.15 statute miles per hour, or one nautical mile per hour. In math terms, we can say "speed equals distance divided by time" (S=D/T). Flipping the expression, "distance equals speed multiplied by time" (D=SxT) and "time equals distance divided by speed" (T=D/S).
In our example, we know our position at 2:10 pm, or 1410; we also know that our distance to the light is 5.4 nautical miles. Assuming our boat speed is 8.1 knots, divide 5.4 by 8.1, and we get 0.66. Two-thirds of an hour is 40 minutes, so our calculation tells us we'll arrive at the light at 2:50 pm. Currents, sea conditions, and winds may affect this, but we still have a good idea of the time it'll take. Follow these steps for each leg of your trip, and you can be confident about where you are and where you're going — with or without the chartplotter.
Navigation Resources
In November 2019, NOAA initiated a process to end all raster nautical chart production over five years and is transitioning to electronic navigational charts. That said, NOAA is aware that some boaters prefer paper charts, so it will offer a new form of paper chart through the NOAA Custom Chart system. This enables users to create, customize, and print paper charts themselves or have large-format charts printed and delivered by a NOAA certified print-on-demand agent.
BoatUS Members receive exclusive savings on the following printed chart products:
- Waterproof Charts: 10% off all charts
- Waterway Guide NV Charts: 20% off all Waterway Guide products
To access savings codes and more discount information, log in to your BoatUS Account, click “resources” at the top, and click on the partner company's logo.
BoatUS Members save at Boat Shows
Make sure to mark your calendars for two exciting events – the New England Boat Show, Chicago Boat Show, and Atlanta Boat Show. Don’t miss out on these incredible shows! BoatUS Members save 25% with code BOATUS25.
Here are the dates for each show: